Making a "flashlight"

Hey,

I’m working on the King Game Jam and am trying to create a good “flashlight effect” in Defold. Basically, I want a black, or near-black screen “lighted up” in the areas I decide (something like https://youtu.be/cIemLP30i_U).

I’ve tried getting into the render, and playing with alpha, but I can’t quite get the effect I’m looking for. Any help or suggestions would be great, thanks!

//Linus

1 Like

You need a custom render script so you can draw your screen in several passes. There is general info on how the rendering pipeline works at http://www.defold.com/doc/rendering

Also, Sven, who knows much more about rendering has provided some excellent info below!

2 Likes

Hey Linus!

As Mikael mentioned, you most likely need to do some changes to your rendering script.

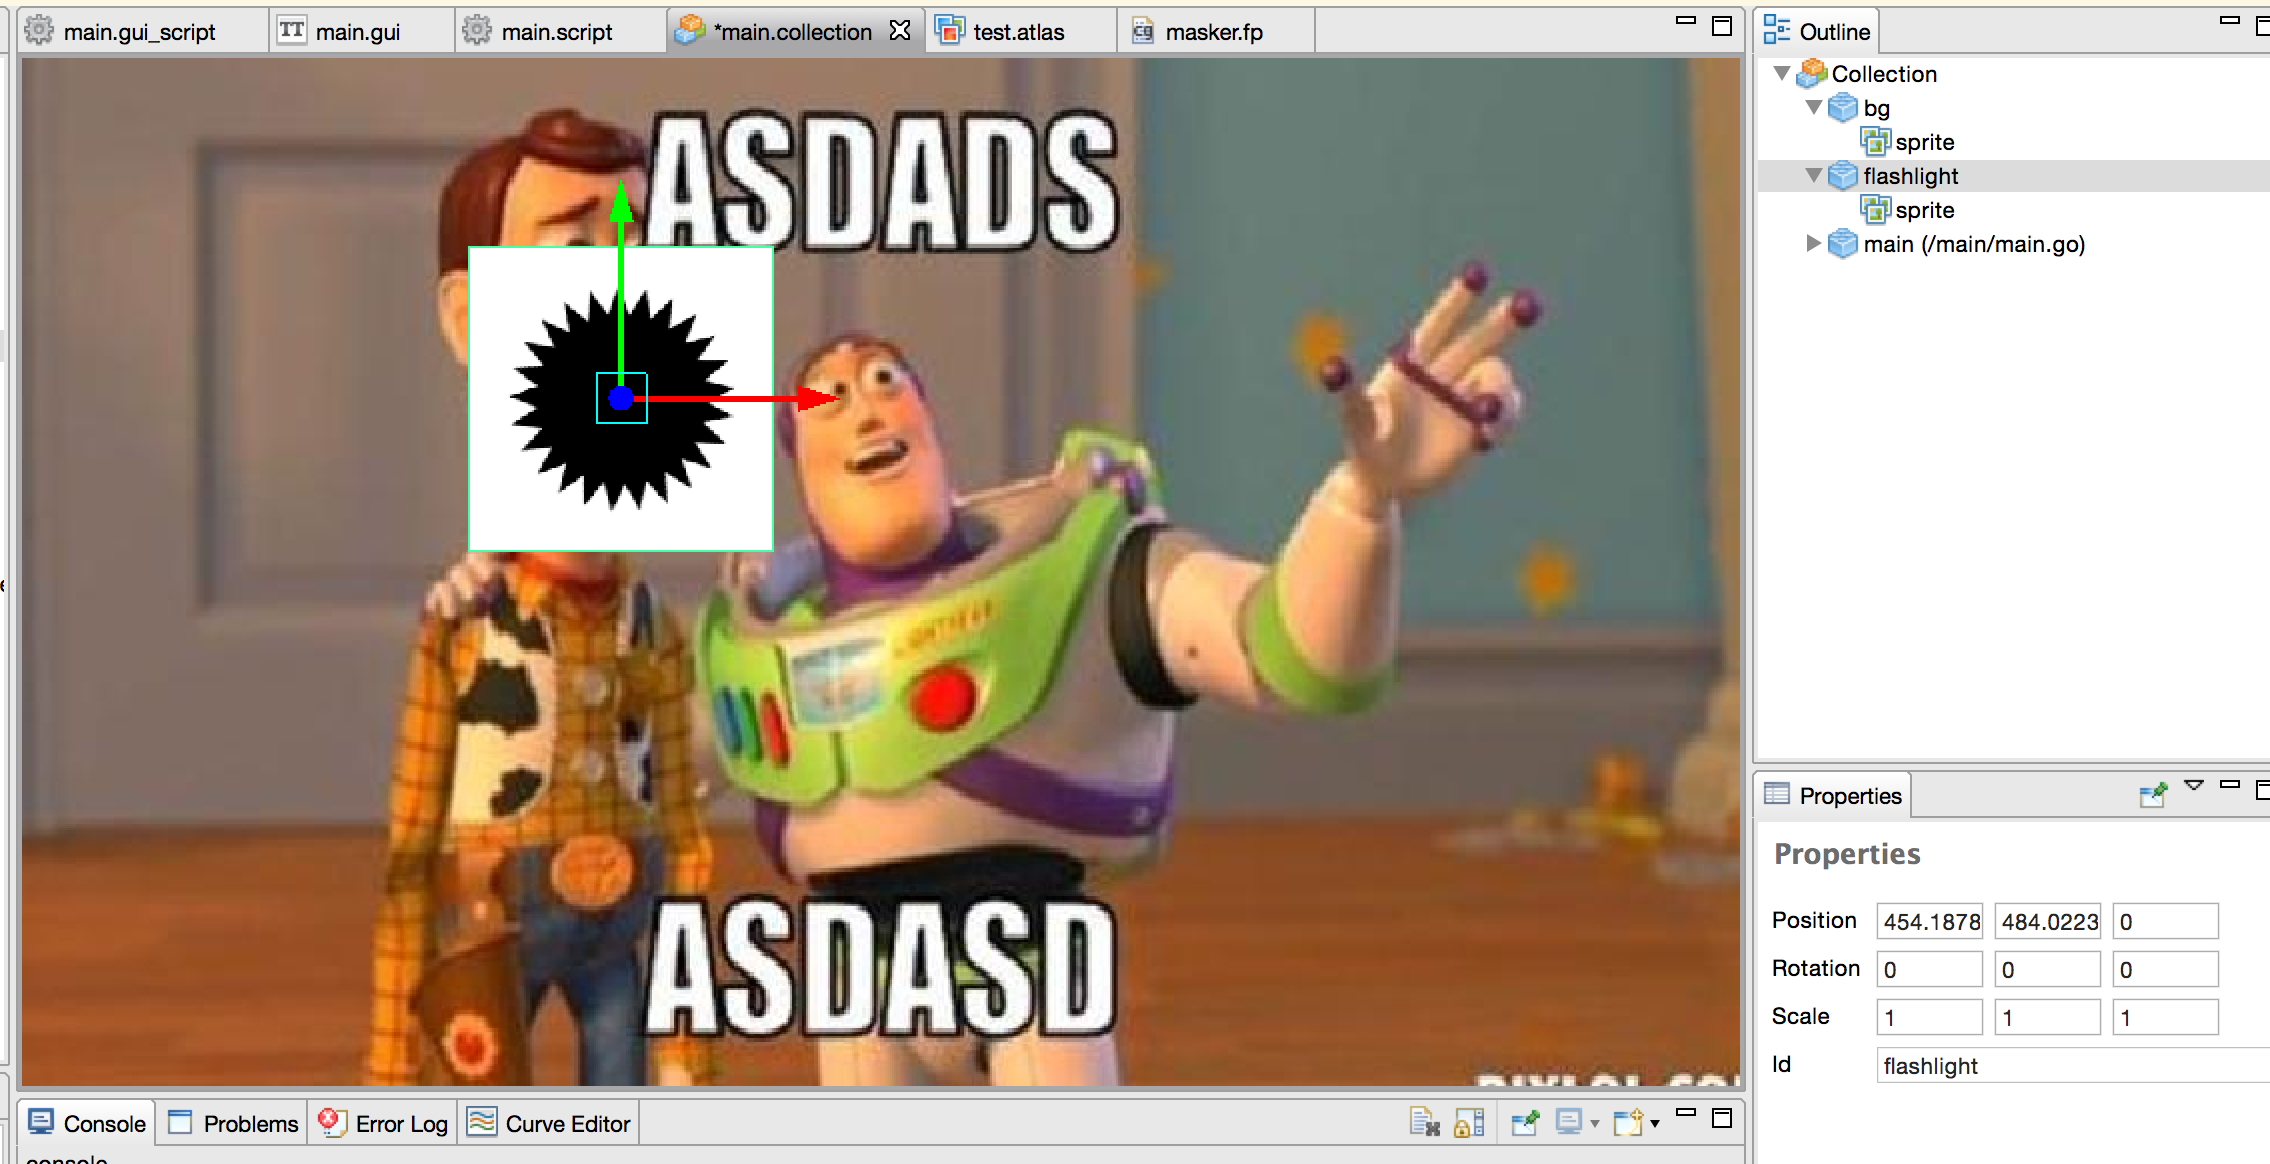
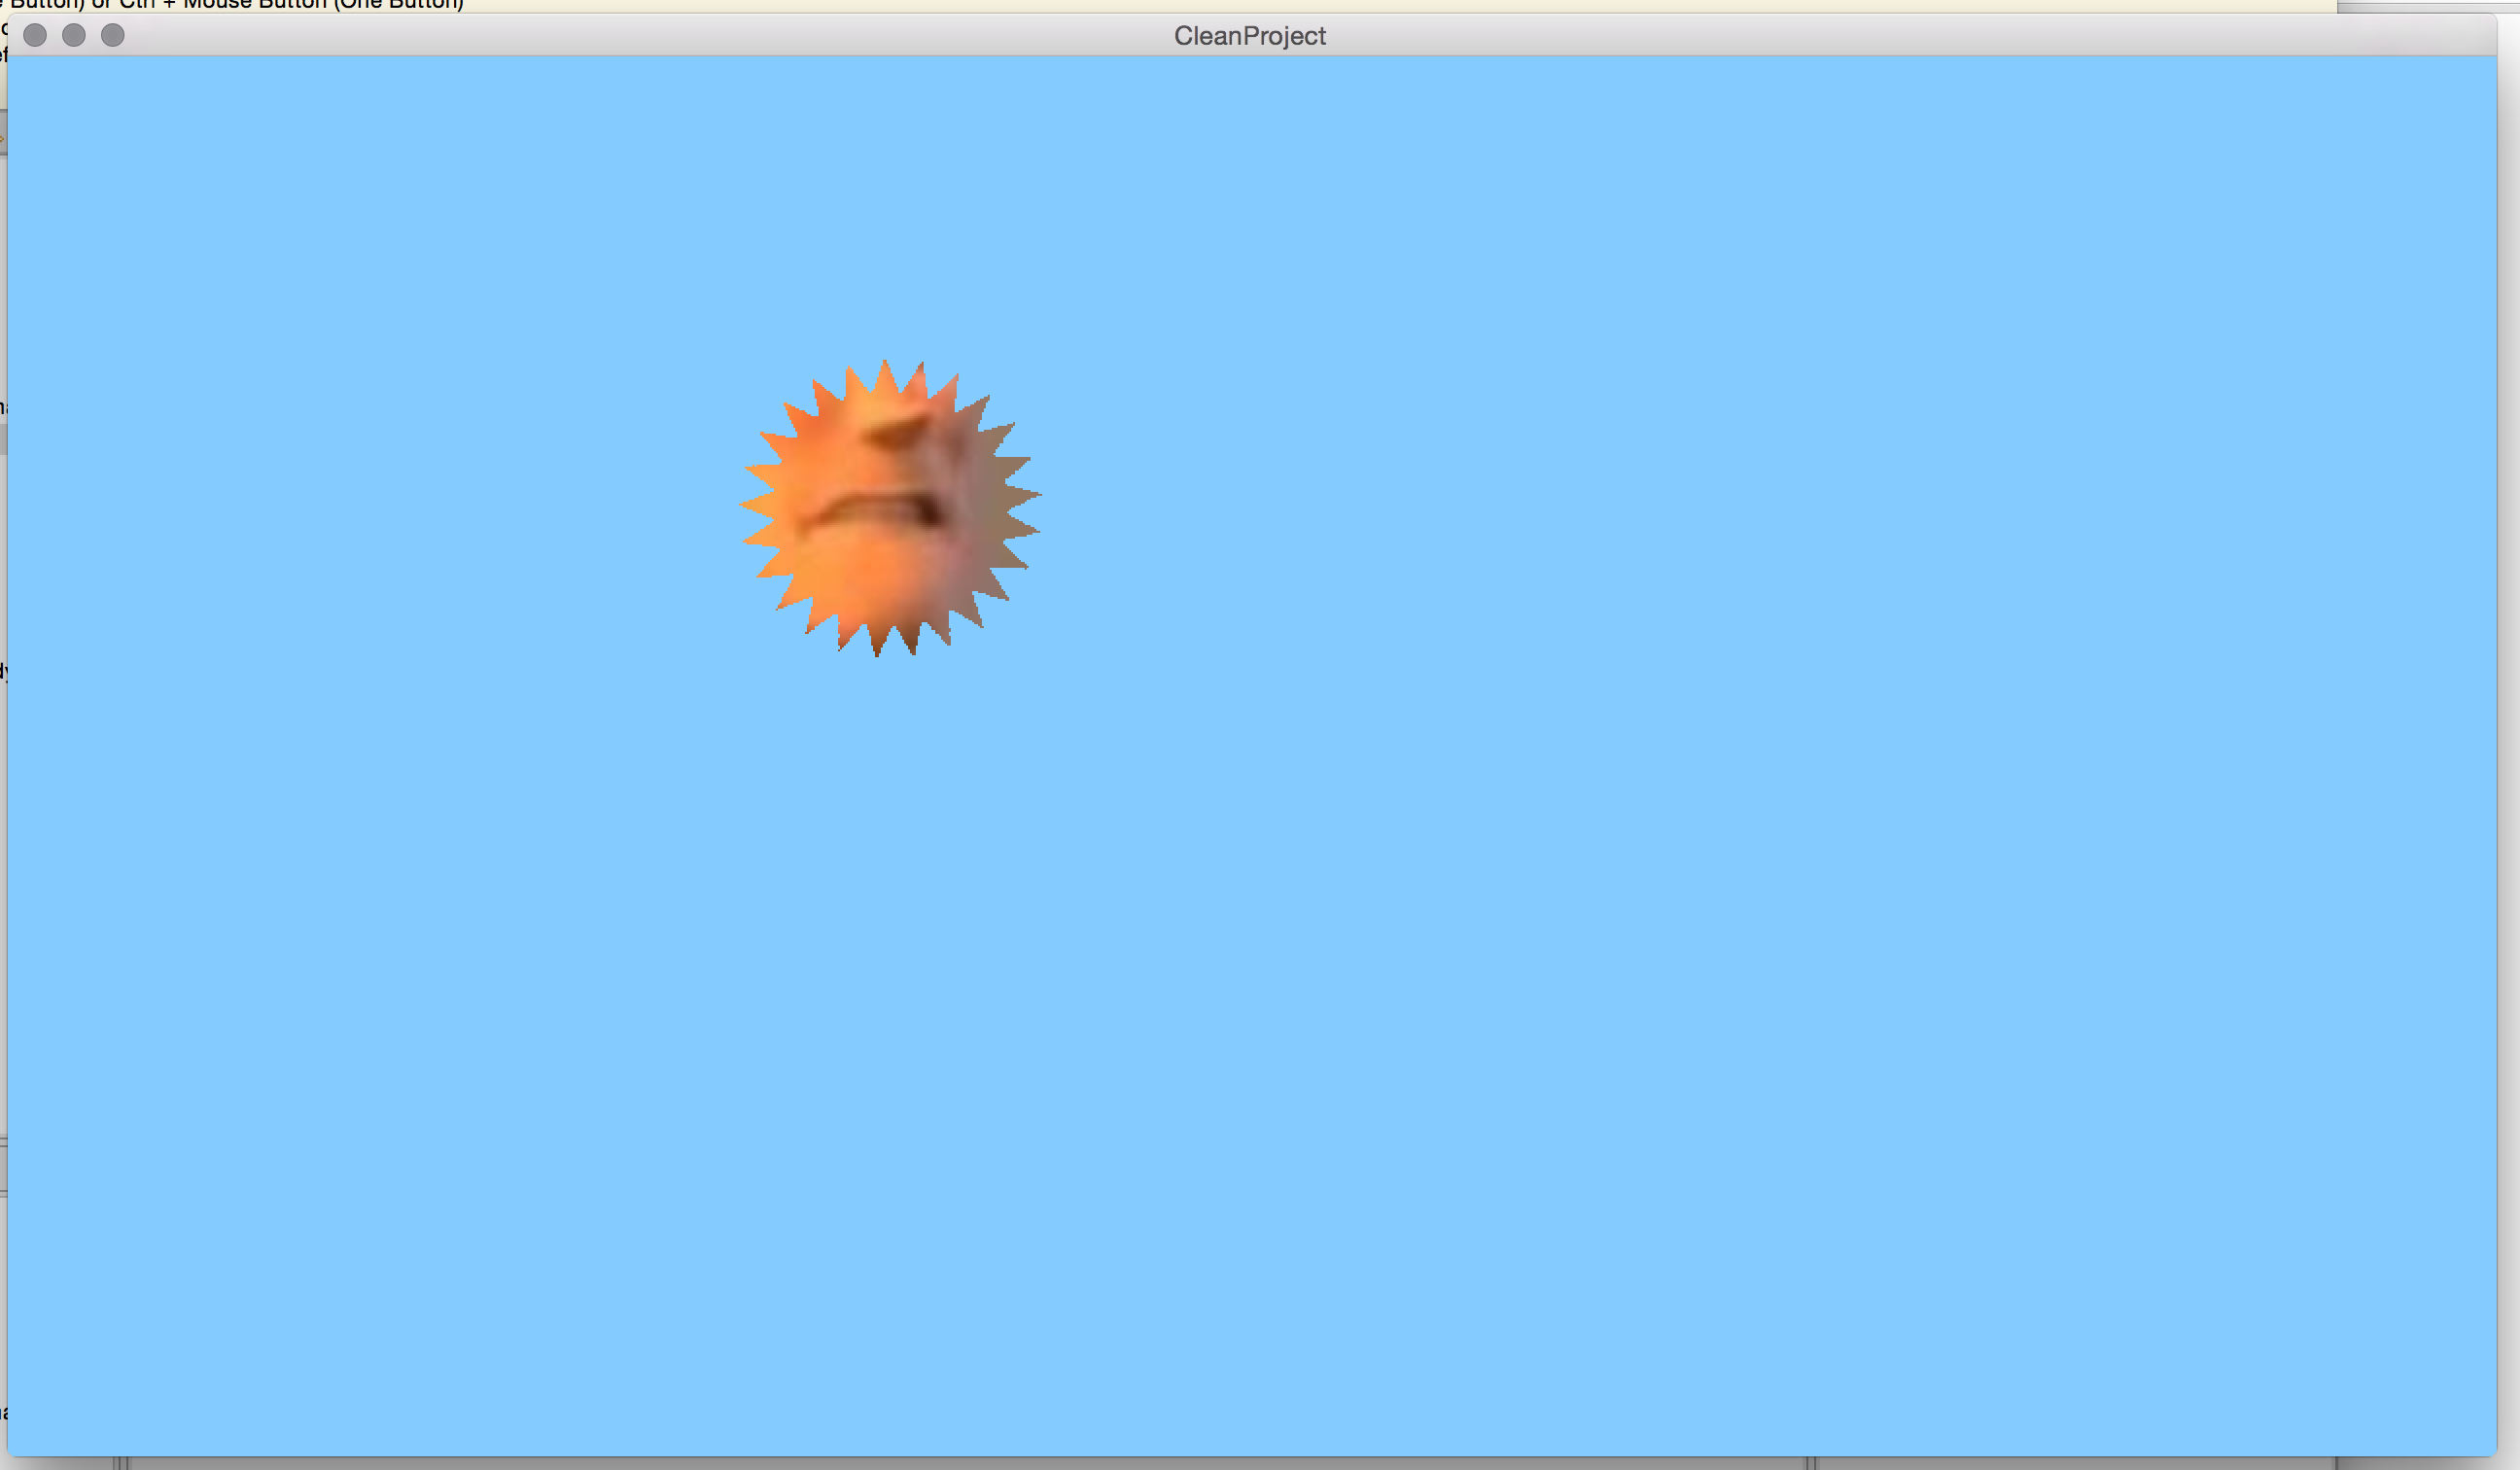
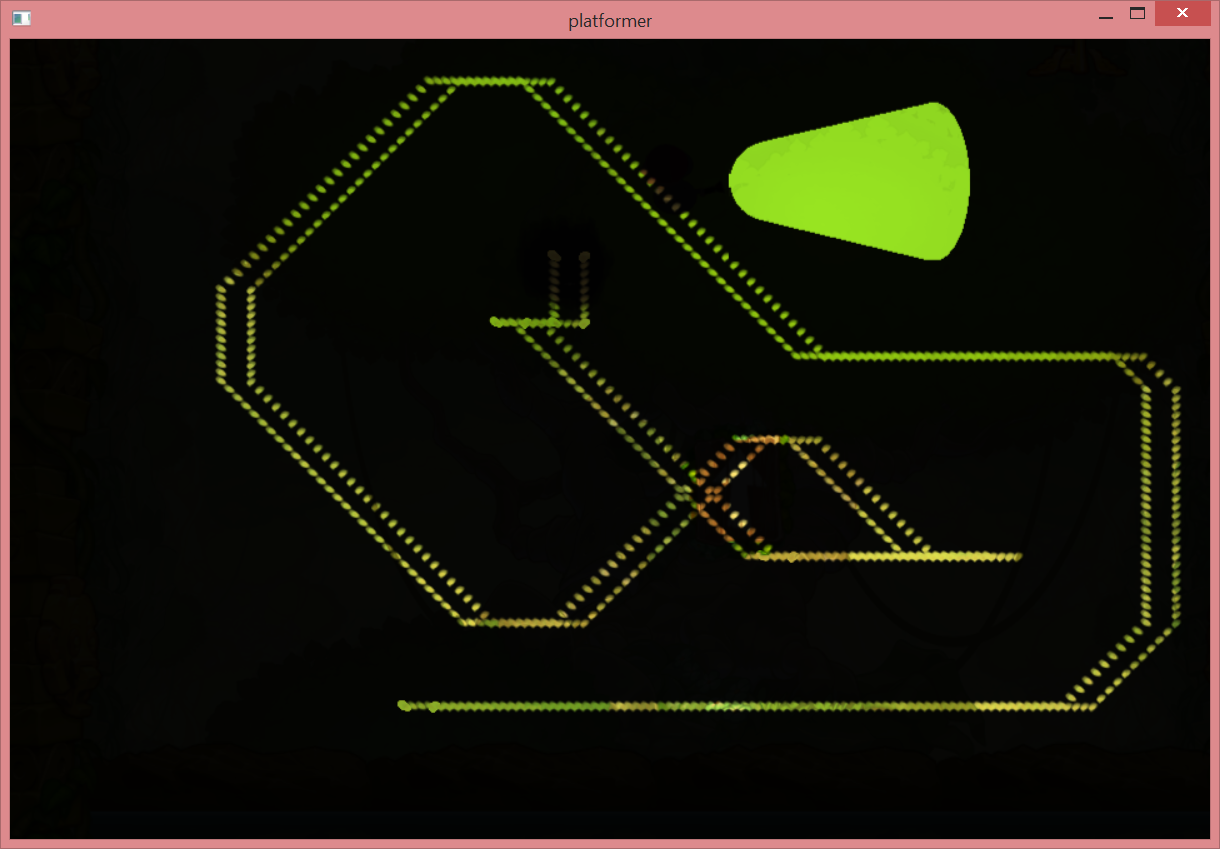
I think there are a couple of ways to do this, one way is to utilise something called “stencil masks”. I did a quick test and created a custom rendering script that does similar to what you are asking.

So essentially I do a game object with a custom material, a material with a special tag I called “mask”. Then I create my own render script (I copied the one in builtins/render/default.render_script) that renders this “mask” tag into a stencil mask before I render the rest of the game.

I added this to my init(self) function:

self.mask_pred = render.predicate({"mask"})

And these changed the update(self, dt) function into this:

function update(self)
    render.set_depth_mask(true)
    render.clear({[render.BUFFER_COLOR_BIT] = self.clear_color, [render.BUFFER_DEPTH_BIT] = 1, [render.BUFFER_STENCIL_BIT] = 0})

    render.set_viewport(0, 0, render.get_window_width(), render.get_window_height())
    render.set_view(self.view)

    render.set_depth_mask(false)
    render.disable_state(render.STATE_DEPTH_TEST)
    render.set_projection(vmath.matrix4_orthographic(0, render.get_width(), 0, render.get_height(), -1, 1))
    
    -- 1. We need to disable color drawing while rendering the mask
    render.set_color_mask(false, false, false, false)
    
    -- 2. Enable stencil test and setup stencil mask parameters
    render.enable_state(render.STATE_STENCIL_TEST)
    render.set_stencil_func(render.COMPARE_FUNC_ALWAYS, 1, 255)
    render.set_stencil_op(render.STENCIL_OP_KEEP, render.STENCIL_OP_KEEP, render.STENCIL_OP_REPLACE)
    render.set_stencil_mask(255)
    
    -- 3. Draw the mask
    render.draw(self.mask_pred)
	
    -- 4. Update the stencil function to only let pixel pass that are equal to the mask result
    render.set_stencil_func(render.COMPARE_FUNC_EQUAL, 1, 255)
	
    -- 5. Re-enable color drawing
    render.set_color_mask(true, true, true, true)
	
    -- 6. Continue as rendering usual! :)
    render.enable_state(render.STATE_BLEND)
    render.set_blend_func(render.BLEND_SRC_ALPHA, render.BLEND_ONE_MINUS_SRC_ALPHA)
    render.disable_state(render.STATE_CULL_FACE)

    render.draw(self.tile_pred)
    render.draw(self.particle_pred)
    render.draw_debug3d()

    render.set_view(vmath.matrix4())
    render.set_projection(vmath.matrix4_orthographic(0, render.get_window_width(), 0, render.get_window_height(), -1, 1))

    render.enable_state(render.STATE_STENCIL_TEST)
    render.draw(self.gui_pred)
    render.draw(self.text_pred)
    render.disable_state(render.STATE_STENCIL_TEST)

    render.set_depth_mask(false)
    render.draw_debug2d()
end

I hope you can use this as some kind of base or just as inspiration! :slight_smile:

9 Likes

Hey!

If you don’t want to be bound by the sharpness of the mask functions, you could also:

  1. Render your game to an offscreen render target: Understanding Render Targets
  2. Render the “lights” similarly to yet another target.
  3. Do a final draw where you use both targets as textures, where you then decide how you want the lights to look, e.g. doing an arbitrary shader blend of the different samples.
5 Likes

Here is a unit-quad which is nice to use as the backing geometry for full screen effects. Save it to a file called quad.dae (collada) extension, add it a model and reference it as the mesh. When you draw it, set both view and projection to identity, and it will always cover the screen.

<?xml version="1.0" encoding="utf-8"?>

  FBX COLLADA exporter2012-10-10T12:34:45Z2012-10-10T12:34:45ZY_UP


              0.000000  0.000000 0.000000 1.000000
            
            
              0.000000  0.000000 0.000000 1.000000
            
            
              0.400000  0.400000 0.400000 1.000000
            
            
              0.000000  0.000000 0.000000 1.000000
            
            
              1.000000


-1.000000 -1.000000 0.000000
1.000000 -1.000000 0.000000
-1.000000 1.000000 0.000000
1.000000 1.000000 0.000000


0.000000 0.000000 1.000000
0.000000 0.000000 1.000000
0.000000 0.000000 1.000000
0.000000 0.000000 1.000000


0.000000 0.000000
1.000000 0.000000
0.000000 1.000000
1.000000 1.000000


3 3 2 2 0 0 3 3 0 0 1 1

0.010000 0.000000 0.000000 0.000000 0.000000 0.010000 0.000000 0.000000 0.000000 0.000000 0.010000 0.000000 0.000000 0.000000 0.000000 1.0000001.000000 24.0000000.0416672.000000
3 Likes

So the lighting works fine with Ragnar’s help, looks cool and all. Unfortunately, anything with the light.material leaves tracks all over the screen. Any ideas on what’s causing this?

Not sure without knowing how your render script and setup looks, but could it be something simple as forgetting to clear both the render targets before rendering to them?

render.clear(...)

Very possible, I’ll take an extra look tomorrow morning and post code if necessary. Time for sleep now.

Thanks for the help!

2 Likes

Ok, so I’ve been fiddling around with the render_script , placing out clears in different spots, but I have no real idea what I’m doing :confused:

Code looks like this:

function update(self)
render.set_viewport(0, 0, render.get_window_width(), render.get_window_height())
render.clear({[render.BUFFER_COLOR_BIT] = vmath.vector4(1, 0, 0, 0)})
render.disable_state(render.STATE_DEPTH_TEST)

render.enable_render_target(self.light_rt)
render.set_viewport(0, 0, render.get_window_width(), render.get_window_height())
render.set_view(self.view)
render.set_depth_mask(false)
render.set_projection(vmath.matrix4_orthographic(0, render.get_width(), 0, render.get_height(), -1, 1))
render.draw(self.light_pred)
render.disable_render_target(self.light_rt)
render.enable_state(render.STATE_BLEND)
render.set_blend_func(render.BLEND_SRC_ALPHA, render.BLEND_ONE_MINUS_SRC_ALPHA)
render.set_view(self.view)
render.set_projection(vmath.matrix4_orthographic(0, render.get_width(), 0, render.get_height(), -1, 1))
render.draw(self.tile_pred)
render.enable_state(render.STATE_BLEND)
render.set_view(vmath.matrix4())
render.set_projection(vmath.matrix4())
render.enable_texture(0, self.light_rt, render.BUFFER_COLOR_BIT)
render.set_blend_func(render.BLEND_ZERO, render.BLEND_SRC_COLOR)
render.draw(self.quad_pred)
render.disable_texture(0, self.light_rt)

Predictably, placing the clear after

render.draw(self.quad_pred)

makes everything a solid color, and placing it in after

render.draw(self.tile_pred)

makes only the lights show, but leaves the tracing problem.

You use render.clear to clear the active render target. Since it’s the stuff with light.material that leaves trails, that means that self.light_rt (the only render target used to draw these things) is not being cleared between frames. Place the clear right after you enable it:

render.enable_render_target(self.light_rt)
render.clear({[render.BUFFER_COLOR_BIT] = vmath.vector4(0, 0, 0, 0)})

This means that anything drawn into that render target the previous frame will now be replaced with solid black.

3 Likes

I could have sworn that I tried that yesterday -_-

Oh well, thanks a bunch :slight_smile:

2 Likes

I’m trying to use this for Fog Of War for my game.

Each character has a black circle sprite around him.
I want to mask so that everything beyond the circle is black
So that you only see player in the middle of the circle, everything else is masked out and black.

I copied the code and it works almost. I get a rectangle instead of a circle around my characters.
It seems to ignore the transparency.

Any idea why?

EDIT: I’m talking about your first example with stencil masks, the Toy Story picture

I have the same problem as Ivan_Liljeqvist, I have no idea why it doesn’t only use the black area but rather the whole picture as the mask. Tried with a fully transparent png, a png with a white background and a jpg all leading to the same result. Any help would be great.

If you are going by my stencil mask post, I think you might need to change your “mask” material to use a custom fragmentshader that does something like this:

varying mediump vec4 position;
varying mediump vec2 var_texcoord0;

uniform lowp sampler2D DIFFUSE_TEXTURE;
uniform lowp vec4 tint;

void main()
{
    vec4 mask_color = texture2D(DIFFUSE_TEXTURE, var_texcoord0.xy);
    if (mask_color.a < 1.0) {
        discard;
    }
    gl_FragColor = mask_color;
}

(I haven’t had time to test this myself.) The main change here is that we “discard” any pixels that have an alpha value under 1. Save this as mask.fp and use as the fragment_program in your mask material file.

I would however suggest Ragnars tips if you want softer edges to your “mask”! :slight_smile:

2 Likes

Now it works how it should, thanks!

1 Like

You should always use discard with great caution, as it alters the GPU’s ability to optimise. To be on the safe side it’s best to not use discard at all. If you really need it, you should check if it results in any perf loss on the target platform. You can do this quite easily by commenting out the discard; statement in the shader, hot-reload it, take it back in, hot-reload etc.

Google search for discard and perf

2 Likes