Lightning VFX + sample project
(this sample project uses features introduced in defold version 1.7.0 and will not work in previous versions.)
Awhile back I had read this forum question asking how these effects are done.
Since then I’ve been wanting to take the time and see if I could make a lightning effect in defold. Finally got around to making a sample project to share. I was also asked how it was done so I wanted to do a hopefully coherent write up.
The Scene Setup ∙
Of course there are many ways to create this sort of effect so first we break the idea down and put it on paper.
- Scenario: make sample project of a space scrolling shooter
- player controls a space ship and alien enemies fly into the scene from above, the classic scroller style.
- animated lightning shoots from the ship out into space
- when an enemy crosses the lightning beam it then locks into the enemy
- no matter where the player ship and enemy are the on the screen the lightning beam should update it’s origin and end positions
- after some damage/time explode enemies and release the lightning back to the ship
Now that the base idea is written down I could always come back to it if needed and so with that I got started. For most projects it can be good to prototype your ideas with some basic graphics this can be referred to as greyboxing/whitebox or blockout and can help speed up production. For this small sample project I had a clear idea of what graphics would be needed so I knocked out some classic pixel art for everything in the scene right away. Creating most the art at a small size then up-scaling a little bit at export. When it came to the lightning instead of creating the effect in the shader I wanted to keep it simple yet have enough detail to make it look decent and fit the pixel art aesthetic so I went with sprites, 12 frame animation that loops well and is 96x820 pixels in size stretching vertically across most the game window for its full detail.
Next I created a new empty project in defold and added the graphic assets then got started setting up the scene collection.
In the end the collection looks like so:

Instead of going over every small detail I will skip straight to the meat on the bone. The Lightning! The main star in the effect isn’t just the lightning sprite animation but is the mesh component which allows us to manipulate the vertices in real-time. Stretching the lightning from one point to another across the screen. The Mesh Component: manual goes over the detail very well on how the component is setup. Next I will go over how I set up the mechanics behind the lightning.
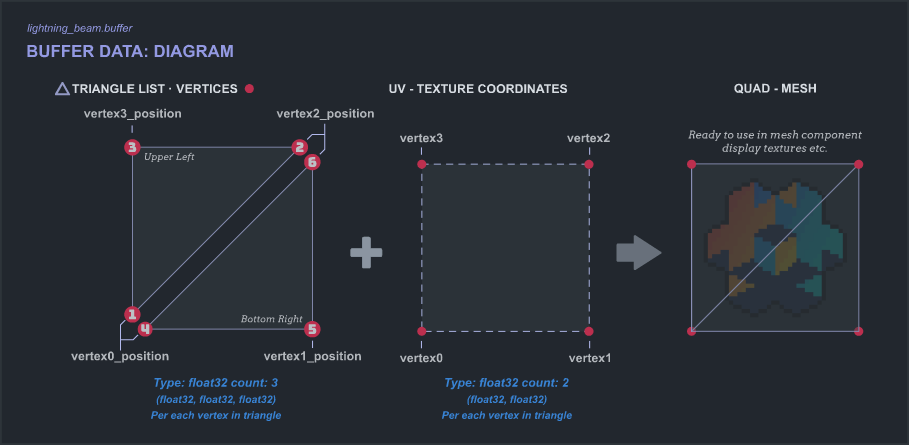
- Quad buffer that defines data for vertex positions & texture coordinates.
Since we are keeping the effect simple and the project is 2d our quad buffer will only need 2 attributes - vertex positions & texture coordinates.
A mesh is made up of triangles and each triangle has 3 vertex positions that define it. A quad is made up of 2 triangles so each one must be defined in the buffer and all other streams must match in length. So a quad has 6 vertices and each one has (x,y,z) positions and are of float type. In the buffer the position type is set to float32 and count is 3 for this reason. To help illustrate the quad buffer data I made a diagram:
…
The lightning Quad buffer
[
    {
        "name":"position","type":"float32","count": 3,"data":

        [
        -1.0,-5.960464477539063e-08,-1.0,
        1.0,-5.960464477539063e-08,-1.0,
        1.0,5.960464477539063e-08,1.0,
        -1.0,-5.960464477539063e-08,-1.0,
        1.0,5.960464477539063e-08,1.0,
        -1.0,5.960464477539063e-08,1.0
        ]

    },{"name":"texcoord0","type":"float32","count":2,"data":

        [
        0.0,0.0,
        1.0,0.0,
        1.0,1.0,
        0.0,0.0,
        1.0,1.0,
        0.0,1.0
        ]

    }

]
Note: As shown above “lightning_beam.buffer” defines only 2 attributes that we want to use in the mesh component and shader. If your project calls for it you could define other data for example∙ normals, another set of uv’s or vertex color then use it in the shader to color your mesh.
- material, shader(vertex & fragment programs)
…
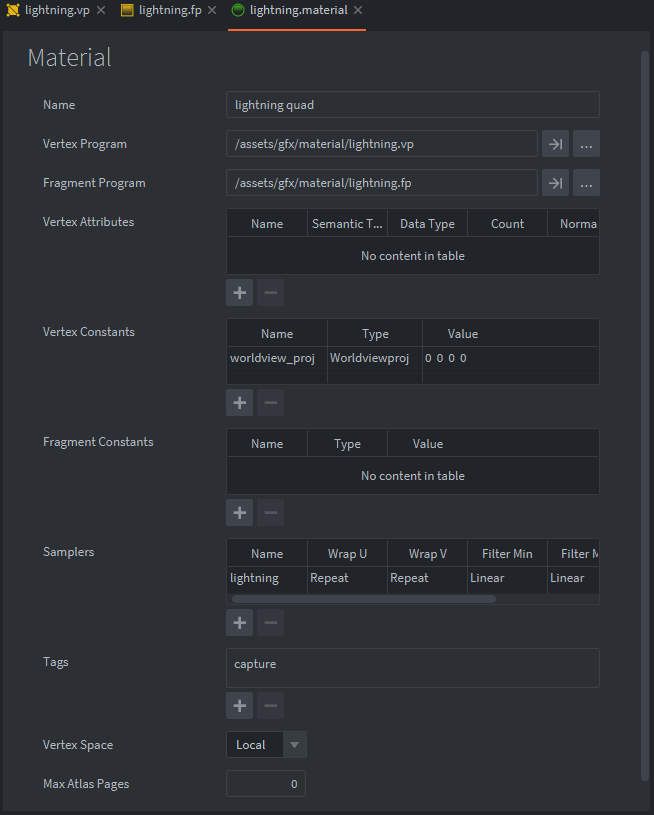
The main things to note in the material are local vertex space is being used, a vertex constant world view projection is used with displaying the mesh and sampler with the name “lightning” is then used in the fragment program as a texture. Also in the render script the texture is made avialable through the predicate. The predicate name is set in the material Tags property and is named “captured”.
lightning.vp - vertex program
attribute highp vec4 position; <--- This is the vertex position data from the buffer
attribute mediump vec2 texcoord0;  <--- This is the texture coordinates data from the buffer

uniform highp mat4 worldview_proj;
varying mediump vec2 var_texcoord0;  <--- We create a varying to send the texture coordinates to the fragment program

void main()
{
    var_texcoord0 = texcoord0;  <--- We set the texture coordinates from the buffer to our varying out

    gl_Position = worldview_proj * vec4(position.xyz, 1.0);
}
lightning.fp - fragment program
varying mediump vec2 var_texcoord0; <--- texture coordinates sent out from the vertex program are now usable in this fragment program
uniform lowp sampler2D lightning;  <--- texture data now can be used in the fragment program

void main()
{
    gl_FragColor = texture2D(lightning, var_texcoord0.xy);
}
- render target resource - color attachment format rgba, since the alpha will be used when displaying the lightning sprite.
…
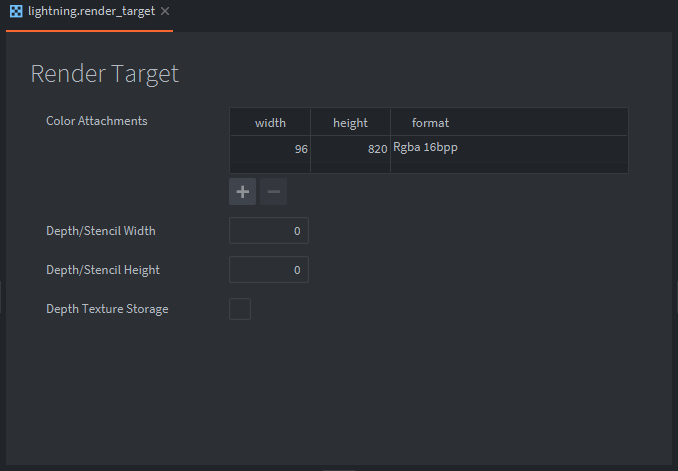
In the render script we will draw to a render target, the “lightning.render_target” resource (*added as an asset to your project) allows us to define the render target parameters. The color attachments define a texture width and height and format. In this case we will not use the depth/stencil so these properties will be ignored.
…
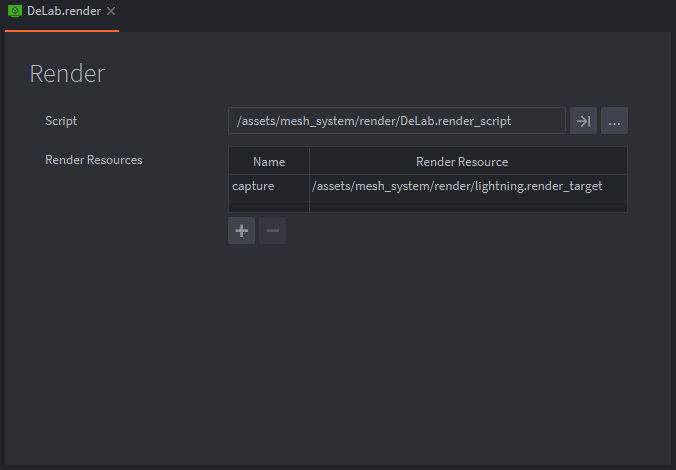
The render “DeLab.render”(*set in “game.project”>Bootstrap settings) contains properties to add resources and here we add the rendertarget resource and in this case we named it “capture” the name will be use to refence the rendertarget in the render script.
- .mesh component that links the buffer data and texture to a material then is used in the shader.
…
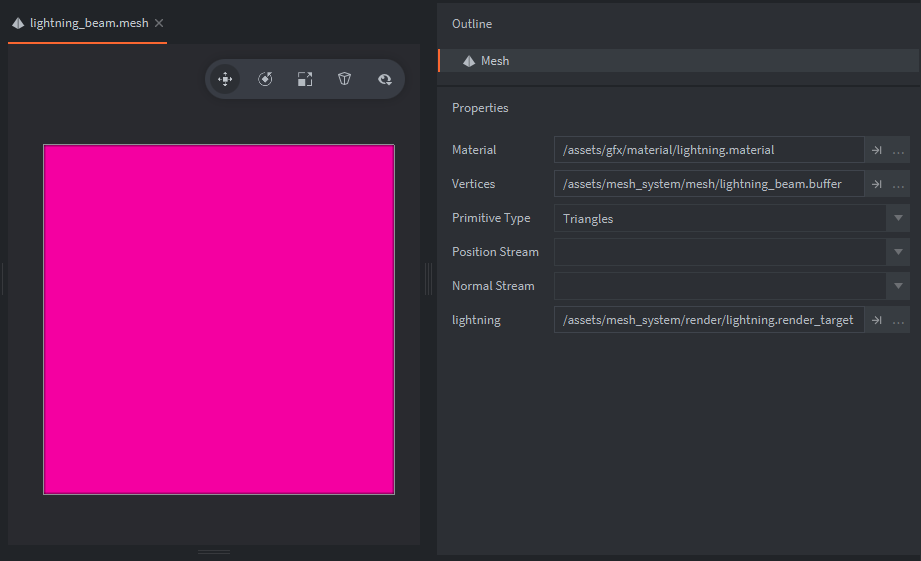
Here we have the lightning_beam.mesh and the properties are set starting with the material∙ “lightning.material”. Next we have the vertices property and we set our mesh buffer here. The primitives are set to triangle list, you could use the other types∙ triangle strips or lines if needed in your project. The position and normal streams are left blank in this case because we are using local vertex space in our material. In the lightning texture slot we set the render target resource “lightning.render_target”.
- The render script “DeLab.render_script” holds logic to capture(*draw to the rt) the animated lightning sprite animation offscreen, then its drawn to the mesh component with the rest of the draw passes.
…
For our vfx we need to display a sprite animation of the lightning on the mesh component, however we can only assign a static texture or render target resource to the mesh components texture slot, we cannot assign an atlas animation. For this reason we want to capture it offscreen drawing it to a render target then use it while rendering the mesh component. We set this up by adding a sprite to the collection scene and set it to play the lightning animation by default, positioning it at an offset so that it’s bottom left corner sits at the world origin position, this is where the rendertarget will capture the sprite animation. The lightning sprite is 96x820px in size and our render target matches that exact size also when we capture the lightning we want to use all of its channels:RGBA that includes its alpha channel that we want to use in the shader. The render target format is setup to capture the red, green, blue and alpha channels. Two predicates are used one for the lightning sprite(“offscreen”) and one for the mesh component(“captured”) the offscreen predicate is never drawn to the frontbuffer(what you see in game) instead its drawn to the rendertarget first then it’s drawn to the backbuffer using the “captured” predicate and shown on the screen in the mesh component when activated.
lightning.render_script
 // the script has been trimmed down to focus on the render target aspects. Review the sample project for the full render script.
...

function init(self)

    self.offscreen_pred = render.predicate({"captured"})  --- predicate for drawing the rendertarget
    self.offscreen_sprite_pred = render.predicate({"offscreen"})  --- predicate for capturing the lightning sprite

------ Offscreen Buffer initialize --------
    self.capture_On = false -- boolean to turn capture on or off in update
    self.offscreen_buffer = "capture"  --- holds a reference to our render target resource

end

...

function update(self)


------------ RENDER OFFSCREEN BUFFER --------------------------
    if self.capture_On then -- start rendering only when true

        render.set_render_target(self.offscreen_buffer) -- set render target resource
        render.clear({[render.BUFFER_COLOR_BIT] = self.clear_color}) -- clear the buffer color bit
        render.draw(self.offscreen_sprite_pred) -- draw the offscreen predicate to the render target
        render.set_render_target(render.RENDER_TARGET_DEFAULT) -- unbind render target

    end

...

------------ RENDER SCENE  ------------------------------------
    if self.capture_On then-- now draw offscreen buffer when true

        render.enable_texture("lightning", self.offscreen_buffer, render. BUFFER_COLOR0_BIT)  --- First set sampler named "lightning", enable the render target texture and enable the color attachment.
        render.draw(self.offscreen_pred)  --- render the final "captured" predicate
        render.disable_texture("lightning", self.offscreen_buffer)  --- disable the render target texture

    end
---------------------------------------------------------------

 ...

end

function on_message(self, message_id, message)

-- When input to fire the lightning is received in controller.script a message is sent to the render script turning the bool on then logic for rendering the rt in update function runs.
-- Later when the lighting beam retracts and is disabled another message is received to flip the boolean back to false thus turning the rendering to rt off.

    if message_id == MSG_SET_CAPTURE then
        self.capture_On = not self.capture_On -- flip offscreen buffer bool on/off
    end

end
- on window resize a scale factor is calculated then used to resize the render target matching the stretch projection.
Resizing Render target
local function update_rendertarget(self) <--- function to resize render target buffer

    self.window_width = render.get_window_width()
    self.window_height = render.get_window_height()
    ---------------------- scale render target with stretch --------------------------------
       local rt_width = 96  <--- same width as lightning sprite
       local rt_height = 820  <--- same height as lightning sprite
       local project_window_height = render.get_height()
       local project_window_width = render.get_width()
       local scale_factor_height = self.window_height / project_window_height
       local scale_factor_width = self.window_width / project_window_width
       local rt_height_scaled = math.floor(rt_height * scale_factor_height)
       local rt_width_scaled = math.floor(rt_width * scale_factor_width)

       render.set_render_target_size(self.offscreen_buffer, rt_width_scaled, rt_height_scaled)
    ---------------------------------------------------------------------------------------

end

...

function on_message(self, message_id, message)

    if message_id == MSG_WINDOW_RESIZED then

    -- When window is resized we 'refresh' the window width & height self tables
    -- then we calculate a scale factor from window width & height and resize the render target to match stretch projection.

        update_rendertarget(self)

    end

end
- Space ship fighter setup ∙
…
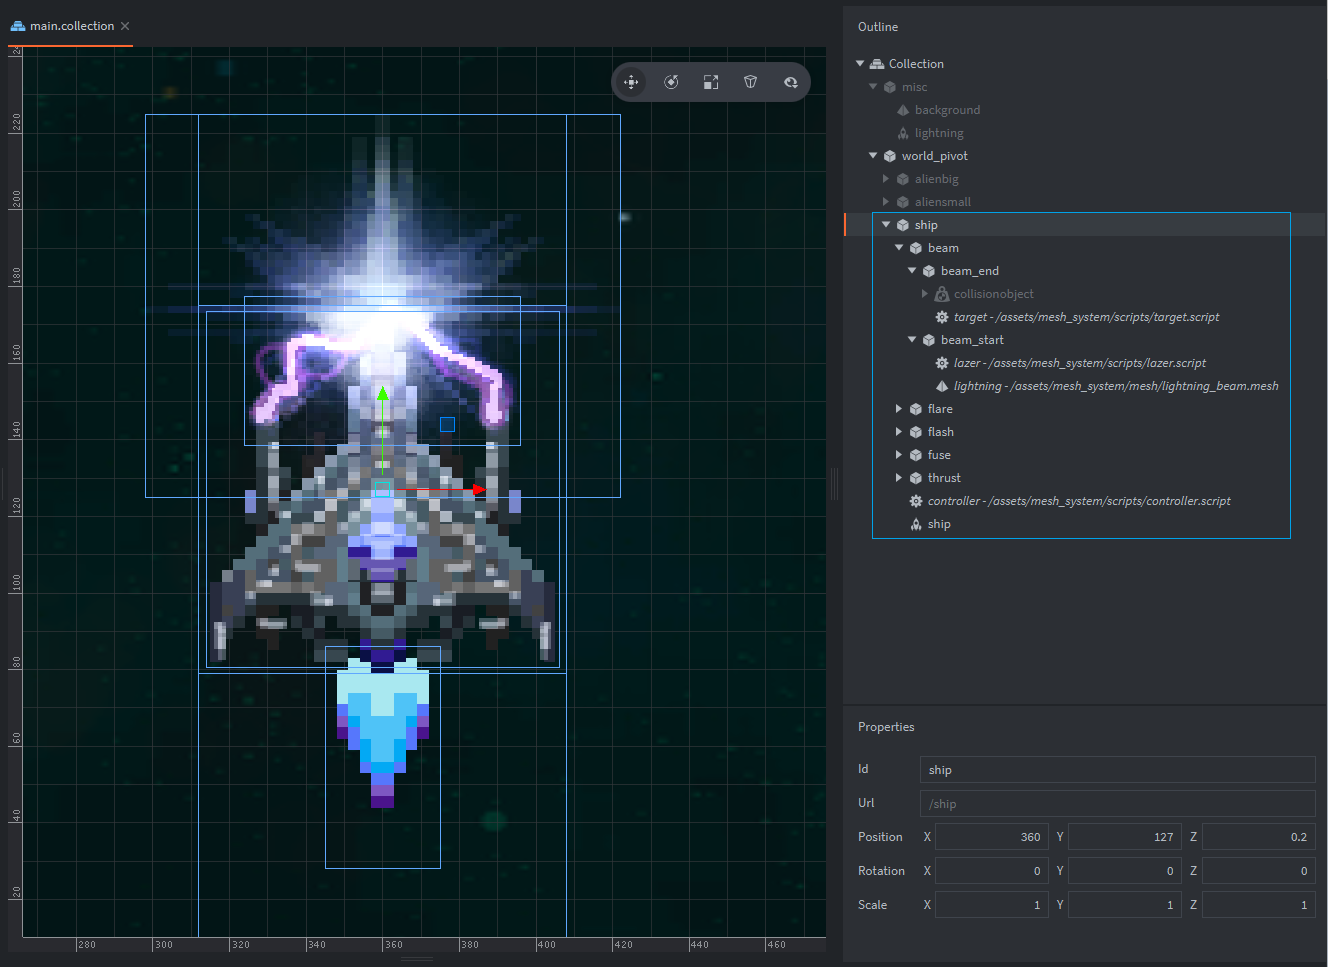
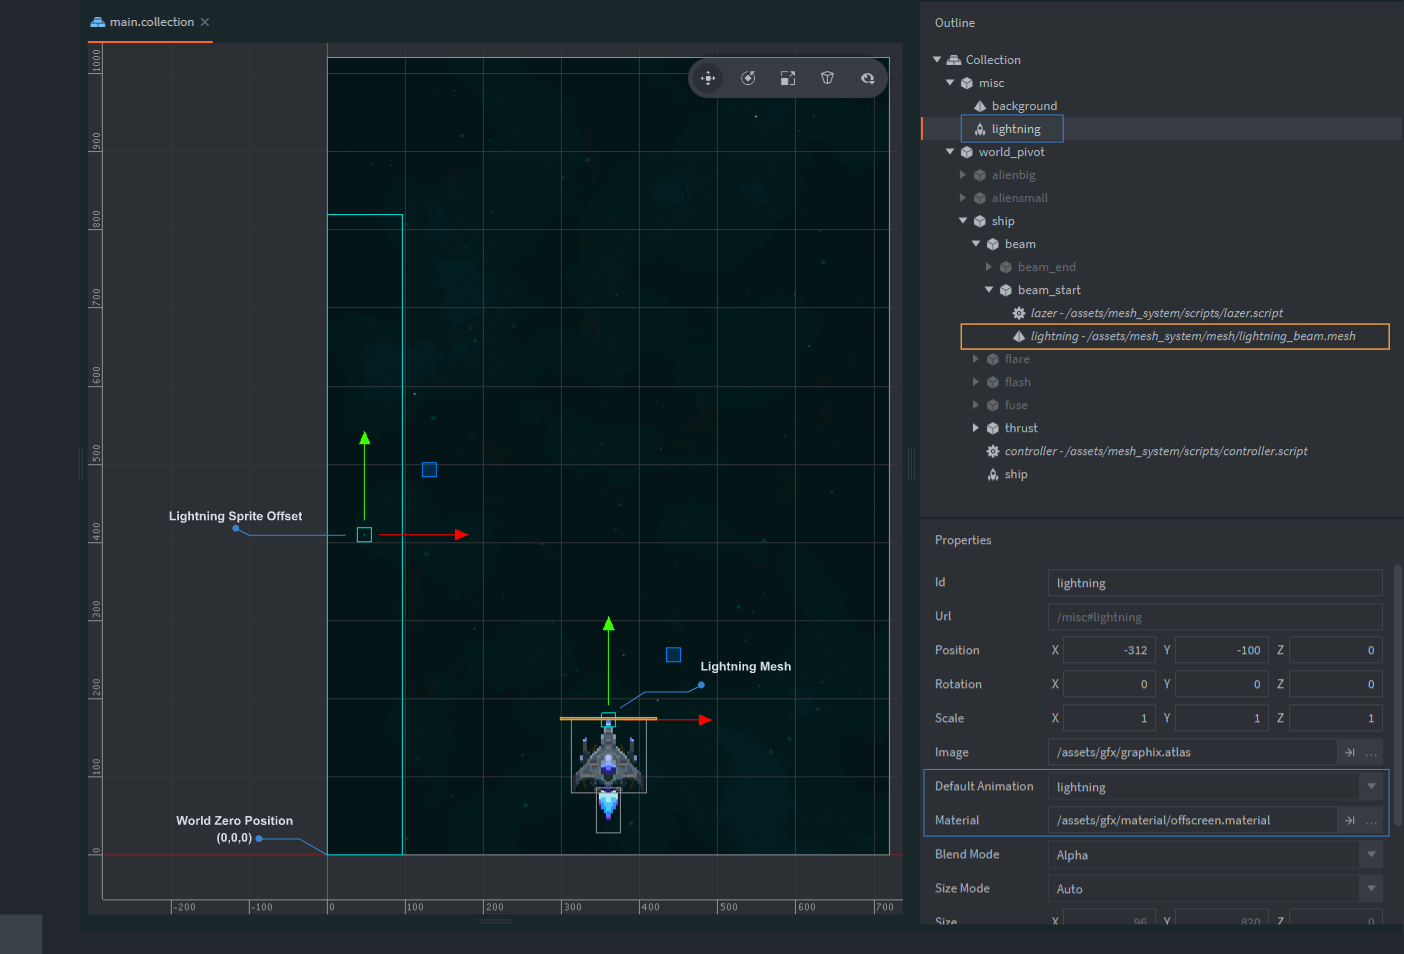
The ship is setup with several child game objects that for the most part are used to position sprites around the ship and they are also used to enable and disable the sprites. The other game objects “beam_start” and “beam_end” are used for the mesh manipulation mechanics. “beam_end” GO has a trigger collision object and a script, when there is a collision trigger enter response the script sends a message with “message.other_id” to the “lazer.script” where its then used to lock onto the enemy. “beam_start” GO has the “lazer.script” and the “lightning_beam.mesh” and is positioned at the ship gun where it will originate from and shoot into space.
- Firing the lightning! Scripts, input logic for firing and physics.
…
In this short video I use render.draw() and a sprite to highlight the bounds of the mesh and also the “beam_end” game objects position. The position is used to update the 2 top vertices of the mesh.
…
In this short video I use physics debug mode set in the “game.project” properties to highlight the collisions happening between the trigger collision objects. As shown the “beam_end” GO locks into position of the enemy when entering the trigger.
lazer.script - updating the mesh quad positions
 // the script has been trimmed down to focus on the render target aspects. Review the sample project for the full render script.
...

local function update_quad_vertices(self)

    local beam_end = go.get_position(END_ID) -- Use beam_end game object as position anchor point for top 2 vertices
    -------------------     Populate vertice positions     ----------------------

    self.vertex3 = vmath.vector4(beam_end.x - beam_half_width, beam_end.y, 0, 0)    -- top left vertice
    self.vertex2 = vmath.vector4(beam_end.x + beam_half_width, beam_end.y, 0, 0)    -- top right vertice
    self.vertex1 = vmath.vector4(1.0 + beam_half_width, 1.0, 0, 0)                  -- bottom right vertice
    self.vertex0 = vmath.vector4(1.0 - beam_half_width, 1.0, 0, 0)                  -- bottom left vertice

    -- Update upper left triangle
    self.positions[10] = self.vertex0.x    self.positions[13] = self.vertex2.x    self.positions[16] = self.vertex3.x
    self.positions[11] = self.vertex0.y    self.positions[14] = self.vertex2.y    self.positions[17] = self.vertex3.y
    self.positions[12] = self.vertex0.z    self.positions[15] = self.vertex2.z    self.positions[18] = self.vertex3.z

    -- Update bottom right triangle
    self.positions[1] = self.vertex0.x    self.positions[4] = self.vertex1.x    self.positions[7] = self.vertex2.x
    self.positions[2] = self.vertex0.y    self.positions[5] = self.vertex1.y    self.positions[8] = self.vertex2.y
    self.positions[3] = self.vertex0.z    self.positions[6] = self.vertex1.z    self.positions[9] = self.vertex2.z

    resource.set_buffer(self.mesh, self.buffer)

end
...

local function focus_lightning(self) <--- When input to fire occurs this function

    if self.is_locked_on then
        local beam_pos = go.get_world_position(".")
        local target_pos = go.get_world_position(self.target) - beam_pos
        go.set_position(target_pos, END_ID)
    end

    ------------------- Buffer Control ------------------------
    self.mesh = go.get(lightning_mesh, "vertices")
    self.buffer = resource.get_buffer(self.mesh)
    self.positions = buffer.get_stream(self.buffer, "position")

    update_quad_vertices(self)

end
...

function update(self, dt)

    if self.has_shot then
        focus_lightning(self)
    end

end
In the main update function we have a boolean that is set to true whenever the lightning is fired. The focus_lightning function updates the buffer every frame while firing, and if the lightning collision is triggered then a boolean flag “self.is_locked_on” is set to true and the beam_end game object is set to the enemies position while being locked on.
- Welp, thats how it was done. Can we improve the VFX?
Improvements?? Well hell yes! This sample project I consider complete. However if we’re taking this idea into an actual game and the project called for it we could make some changes for sure. Here are a few ideas.
-
When the mesh is at certain angles that stretch to much or positions are to close break the lightning from its locked on state and reset. so we should create a min distance and max distance and same for angles which we would need to caculate.
-
Use shader to create some lighting. This would be fun if it fits your games art style, I imagine a lightning beam that starts bright then fades in saturation to black as another beam strikes and its fading away replacing the focus of the other.
-
This one would be wild, add more vertices to the mesh buffer along the vertical stretch and animate the vertices in different patterns. Would make for some cool lazer effects!
- Extras:
Profiler:
…
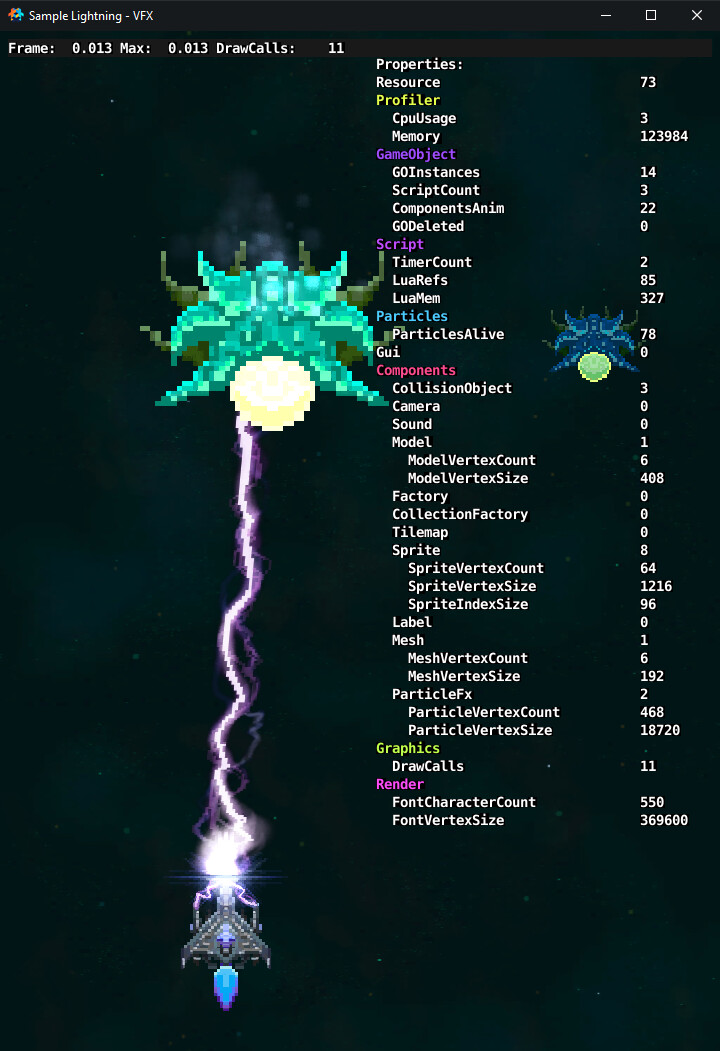
In total - this lightning VFX is quite lightweight. Sample project html5 build sits at 2mb zipped, We get 4 to 15 max drawcalls in the active scene, there may be room for Improvements here. Also the flashing tint for the enemies and the weapon flash use the new vertex attributes introduced in defold 1.7.0
Note Highlight:
I want to highlight the format that the mesh component and buffer are in. This gives us the oppurtunity to generate meshes/buffers from say blender or other tools you may be using in your production.
…
The sample project is available here:
https://github.com/FlexYourBrain/sample_LightningVFX
Cheers~
![]()