
Fantastic! I’ve been eagerly awaiting a release since first playing the competition entry, which immediately hooked me (sorry!).
5 Likes
#3: Tutorial Design
Teaching through play
I don’t explain anything to the player, including the controls. All actions are done by pressing one of the 7 buttons visible on the screen at all times. You never need to press more than one button at a time and when a button won’t do anything it gets disabled (greyed out).
This is a puzzle game so I want to encourage the player to get into the mindset of working things out for themselves. The first few levels have been iterated a lot to set up scenarios that force the player to discover how a gameplay mechanic works.
A puzzle is something you initially don’t know how to solve, so every level is arguably a tutorial on how to solve itself. As players progress they get a deeper understanding of mechanics and how they relate to each other, even learning some patterns of layout or movement they can use as tools in multiple levels. There are a number of reasons that motivate level design and one of them is to teach the player something specific, or rather encourage them to work it out for themselves. Here are a few of those levels.
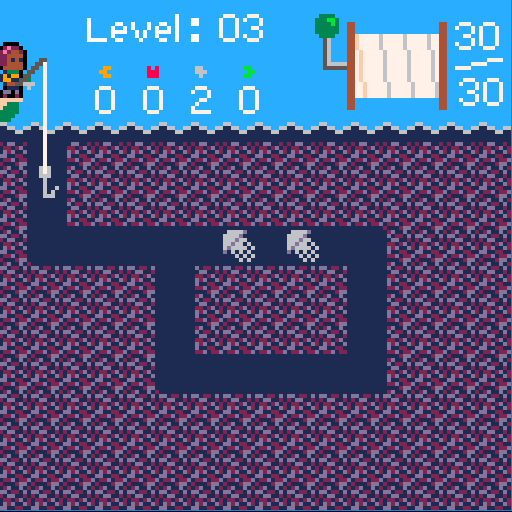
Movement and win condition
In the first level players discover how to move the hook around (push the arrow buttons) and reel it back in (push the circle button). They’ll probably also realise that they can’t cross their own line or move through purple blocks, and might notice that they have a limited line length (shown by the reel in the top right). Once they move into a fish they’ll find that they can’t move again and must reel it in. If they’re really observant they’ll also notice the counters along the top that count down as they catch the fish. The curious ones might also try pressing the undo button (backwards pointer) or pause menu button (cross).
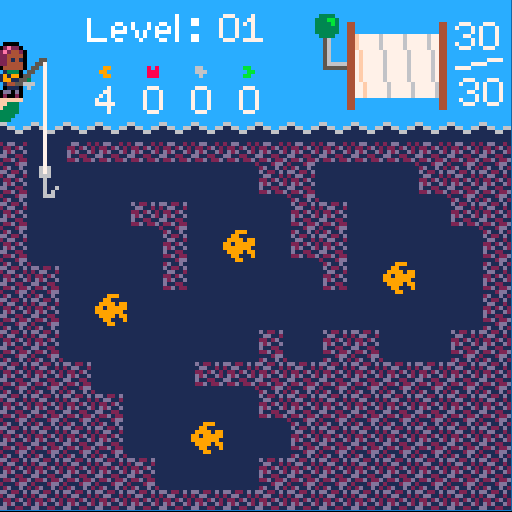
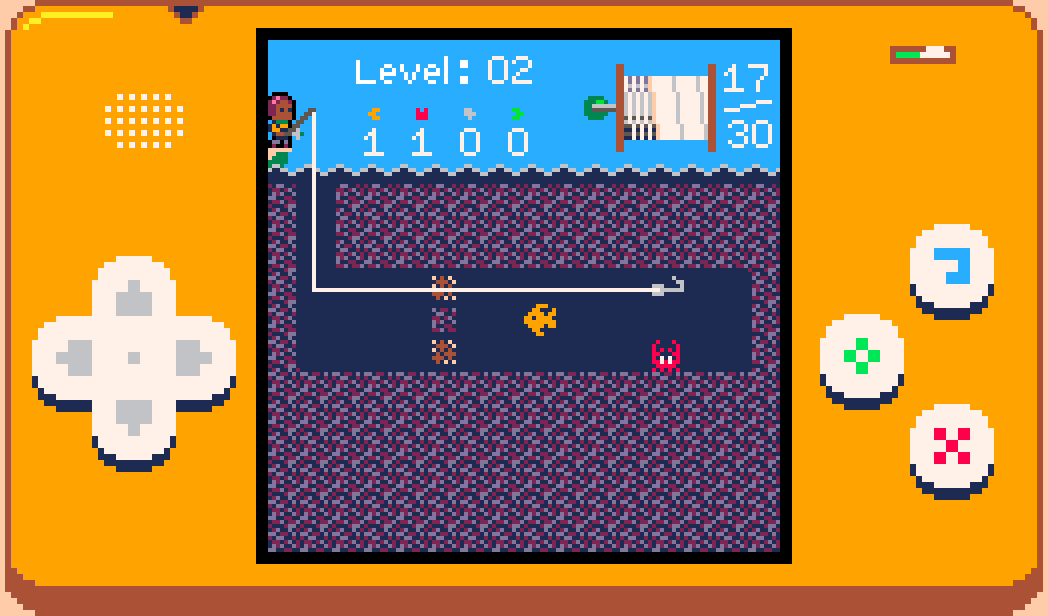
Crabs and debris
In level two the player is confronted with brown blocks they haven’t seen before. They can’t do anything other than try and move through them, which they can. Well there’s a fish right behind the blocks and they solved the previous level by catching fish, so they’ll probably try to reel it in, only to discover they can’t pull fish through brown blocks and will drop them instead. A lot of players will try pulling the fish through the other brown block, just in case. When that fails too there’s nothing left to do but approach the crab, which is when players find that they can reel crabs in too and that crabs smash brown blocks. The observant ones will notice that doing so reduced their line length by 5.
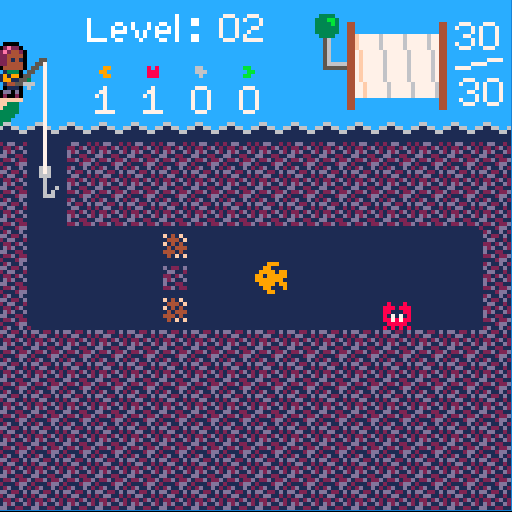
Squid, ink and how to get out of an unsolvable state
Level 3 introduces the squid and ink mechanics and is the first puzzle where the player can get it into an unsolvable state. After catching the first squid they see a trail of 5 ink tiles, which it turns out they can move through but can’t pull creatures through. The level is now unsolvable, so players will eventually try hitting the pause button and finding the restart menu item, or try the undo button and go back to a solvable state. Some players pre-emptively solve this by getting the rear squid first without knowing what will happen. I might iterate some more on this one, but then again the interaction with ink is simple and easily found later.
Jellyfish and skeletons
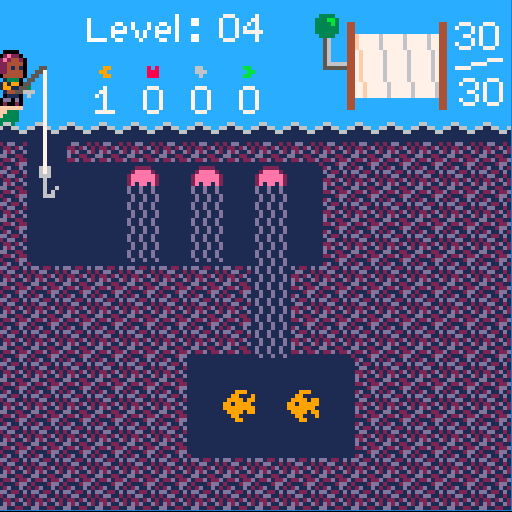
Fish, I remember those! Here players will find they can’t move through or catch jellyfish, but they can move through their stingers. Trying to pull one of the fish through will kill it, blocking the path with a skeleton. There’s nothing left to do but try and catch that, only to discover that skeletons cut stingers. Observant players will realise that they don’t necessarily have to catch every creature in a level, the counters at the top describe the win condition.
Sea sponges
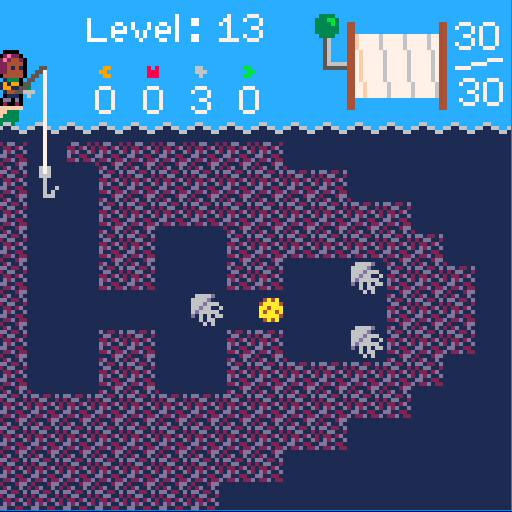
Not all mechanics are introduced immediately. After the fish, crab, squid and jellyfish are introduced there are several levels using combinations of those mechanics to reinforce understanding and let the player start solving ‘real’ non-tutorial puzzles. Some smaller mechanics / patterns are taught in those. This is an example of a later level that introduces the sea sponge, which can absorb a single ink tile. It also features the pattern of two squid in a 3x3 cave which is used a few times with different squid and entrance positions.
Follow me on Twitter @rhythm_lynx
9 Likes
I wanna play it already 
2 Likes

Hi Connor,
Question on how you are handling your levels… Is each level its own collection, or do you have separate collections for each level?
#4: Bootstrapping, menu transitions and level loading
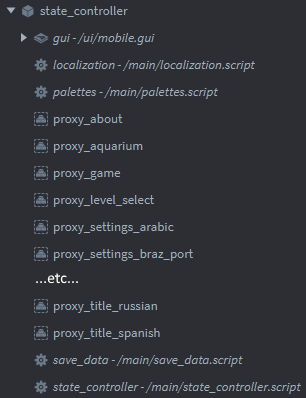
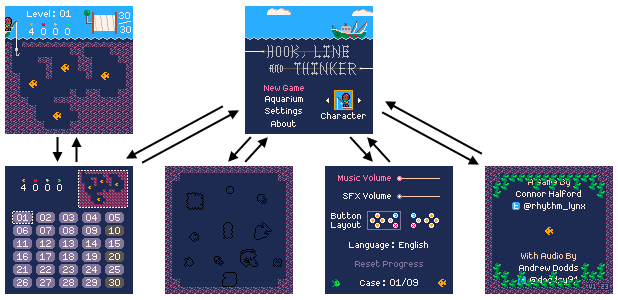
There are 6 main screens in Hook: the title screen, level select, gameplay, aquarium, settings and about.
Each of these is a separate .collection file in Defold with an additional main.collection acting as the bootstrapper that loads and enables/disables all the others. For localization purposes there are different settings screen and title screen collections for each language (settings_english.collection, title_french.collection etc.) but that can wait for a post about localization. For the purposes of this post there are 7 collections: main plus one for each screen.
First, a disclaimer
I don’t know what I’m doing. This is my first project in Defold and a lot of very important project and code structure decisions were made under extreme time constraints during the first few weeks of the project (see devlog #1). It’s very likely I’m doing some really weird stupid stuff which isn’t necessarily a good idea you should copy. So long as it works I really don’t care. Also my game and especially my assets are tiny so I can get away with basically whatever I want without having to worry about performance.
So, what happens on startup?
The bootstrap main collection in the project settings is my aptly named main.collection. This contains a game object called state_controller which has a collection proxy for every other collection and the also aptly named state_controller.script.
The relevant bits from state_controller.script look something like this:
function init(self)
	load_save_data()
	lang_suffix = language_suffix(g_save_data.language)

	g_current_state = g_STATE_UNINITIALIZED
	self.num_proxies_loading = 6
	self.startup_load = true
	self.load_pause = 0
	msg.post("#proxy_title"..lang_suffix, "load")
	msg.post("#proxy_level_select", "load")
	msg.post("#proxy_game", "load")
	msg.post("#proxy_aquarium", "load")
	msg.post("#proxy_about", "load")
	msg.post("#proxy_settings"..lang_suffix, "load")
end

function update(self, dt)
	if self.load_pause > 0 then
		self.load_pause = self.load_pause - dt
		if self.load_pause <= 0 then
			change_state(g_STATE_INTRO_CLOUDS)
		end
	end
end

function on_message(self, message_id, message, sender)
	if message_id == hash("proxy_loaded") then
		msg.post(sender, "enable")
		if g_current_state == g_STATE_SETTINGS and string.find(""..sender, "settings") then
			begin_settings_state("language")
		else
			msg.post(sender, "disable")
		end
		if self.startup_load == true then
			self.num_proxies_loading = self.num_proxies_loading - 1
			if self.num_proxies_loading <= 0 then
				self.startup_load = false
				self.load_pause = 0.01
			end
		end
	end
end
Since you can change your language in the settings menu the current language is stored in the save data. The load_save_data() function will either load an existing save file or populate a new save file with the current system language.
The key thing is that the other six proxies all begin loading right at startup and are never unloaded. My game and assets are so small that memory is not even remotely an issue, so the only loading ‘hitch’ should be right here on startup and then every menu transition at runtime should be seamless. In reality these loads are near instantaneous anyway. Making incredibly low resolution pixel art games has its advantages.
As each collection finishes loading we enable then immediately disable it, just to flush all the game object state properly. Since each version of the settings screen in each language is a different collection, changing the language triggers some proxy loading and we don’t want to disable the settings menu if we’re in there currently. Once everything has loaded there is an additional brief pause to let everything settle before kicking off the intro/startup cloud pan cinematic and transitioning to the title screen.
Changing the current state/menu
The gameplay and title screen rest at the ocean surface while the other screens reside underwater. This gives a natural, simple and visually pleasing menu transition of simply panning the camera up or down, but does restrict which screens you can move between. For example you cannot go directly from settings to about (you have to go up to the title first), or directly from the game to the title (you must go down to level select). A side benefit here is that we can safely make some assumptions, for example we know that if we’re transitioning to the level select screen we must be coming from the surface. Some systems such as the camera pan don’t need to know or care whether we’re coming from gameplay or the title screen, it’s just surface to underwater.
Incidentally yes, the underwater parts of the game really are just happening several hundred pixels below the surface. The change_state function of state_controller.script manages acquiring and releasing input focus, enabling the collection we’re transitioning to, setting up the collection if necessary (through an “entering” message or similar) and triggering the camera pan itself. Once the pan completes we disable the collection that we just left.
function change_state(new_state, level_num)
	local to_disable = nil
	if g_current_state == g_STATE_LEVEL_SELECT then
		to_disable = "main:/state_controller#proxy_level_select"
		msg.post("level_select:/controller", "release_input_focus")
	elseif g_current_state == g_STATE_GAME then
		-- ...etc...
	end

	g_current_state = new_state

	if g_current_state == g_STATE_LEVEL_SELECT then
		msg.post("main:/state_controller#proxy_level_select", "enable")
		msg.post("level_select:/controller", "acquire_input_focus")
		msg.post("level_select:/controller", "entering")
		start_cam_move(CAM_Y_SURFACE, CAM_Y_UNDERWATER, to_disable)

	elseif g_current_state == g_STATE_GAME then
		-- ...etc...
	end
end
Level previews on the level select screen
Each level is just a plain tilemap. There’s a level.go game object with every tilemap attached and a factory for each type of game object a level can consist of (fish, seaweed etc). This level.go object is used both in the gameplay collection and the level select screen collection.
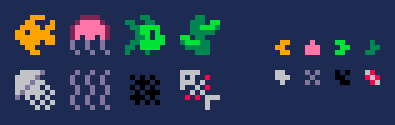
Whenever you change the currently selected level the generate_minimap function of level_select.script updates the preview by spawning a set of sprites to represent the level tilemap. It was a lot of fun trying to represent things in 8x8 sprites, then fun again to try and boil those down to 3x3. Here are a few:
At some point I’ll update the following code to have a fixed array of sprites that are reused and enabled/disabled as needed, but since a lot of tiles are empty space it was quicker to just throw them all away and only spawn in the ones that are needed. Major time constraints therefore inefficient code and magic numbers blah blah here’s the code:
local function generate_minimap(self)
	go.delete_all(self.minimap_tiles)
	self.minimap_tiles = {}
	local tile, tx, ty, id = nil, 0, 0, nil
	local pos, anim = vmath.vector3(0, 0, 0), ""
	for x = 1, 16 do
		for y = -11, 0 do
			tile = tilemap.get_tile("tilemap_parent"..get_tilemap_name(self.cursor), "layer1", x, y)
			pos.x = 71 + x * 3
			pos.y = Y_OFFSET - 5 + y * 3
			if tile ~= 0 then
				id = factory.create("#factory_minimap", pos)
				table.insert(self.minimap_tiles, id)
				anim = "coral"
				for i = 1, #g_SPAWN_TILES do
					if tile == g_SPAWN_TILES[i].tile then
						anim = g_SPAWN_TILES[i].type
						break
					end
				end
				msg.post(id, "play_animation", { id = hash(anim) })
			end
		end
	end
end
So, what happens on level load?
When you actually load a level the tilemap is iterated across and whenever a tile that should spawn a gameobject is encountered (e.g. a fish) that gameobject is spawned from a factory and the tile in the tilemap is set to 0 (blank). This is because the tilemap is referred to by gameplay logic for collision checks with the walls. When the level is unloaded any edited tiles in the tilemap are reset to their original values. Here’s a very simplified version of the level loading and unloading functions:
g_SPAWN_TILES = {
	 [1] = { tile = 27, type = "crab" },
	 [2] = { tile = 25, type = "fish" },
	-- ...etc...
}

local function unload_level()
	tilemap_name = get_tilemap_name(g_level_num)
	for i = 1, #reset_tiles do
		tilemap.set_tile(tilemap_name, "layer1", reset_tiles[i].x, reset_tiles[i].y, reset_tiles[i].original)
	end
	reset_tiles = {}

	for i = 1, #g_creatures do
		go.delete(g_creatures[i].id, true)
	end
	g_creatures = {}

	collectgarbage()
end

local function load_level(level_num)
	unload_level()

	-- Only enable the tilemap for the current level
	local tilemap_name = nil
	for i = 1, g_NUM_TILEMAPS do
		tilemap_name = get_tilemap_name(i)
		msg.post(tilemap_name, "disable")
	end
	tilemap_name = get_tilemap_name(level_num)
	msg.post(tilemap_name, "enable")

	-- Loop through the tilemap and spawn creatures
	local tile, fact, type, anim, frame, new_id
	local prev_creature = nil
	for x = 1, 16 do -- left to right
		prev_creature = nil
		for y = -11, 0 do -- bottom to top
			tile = tilemap.get_tile(tilemap_name, "layer1", x, y)
			fact = nil
			type = nil

			for spawn = 1, #g_SPAWN_TILES do
				if tile == g_SPAWN_TILES[spawn].tile then
					type = g_SPAWN_TILES[spawn].type
					fact = "#factory_"..type
					frame = tile - g_SPAWN_TILES[spawn].tile
					anim = type..frame
					break
				end
			end

			if fact == nil then
				prev_creature = nil
			else
				new_id = factory.create(fact, vmath.vector3(8 * (x - 1), 8 * y, -go.get_position().z))
				msg.post(new_id, "set_parent", { parent_id = go.get_id(), keep_world_transform = 0 })
				msg.post(new_id, "play_animation", { id = hash(anim) })
				table.insert(g_creatures, { id = new_id, type = type, frame = frame, removed = false })
				tilemap.set_tile(tilemap_name, "layer1", x, y, 0)
				table.insert(reset_tiles, { x = x, y = y, original = tile })

				if type == "squid" then
					add_ink(g_creatures[#g_creatures], 5)
				elseif type == "sting" then
					g_creatures[#g_creatures].marked_for_removal = false
					if prev_creature ~= nil and prev_creature.type == "sting" then
						prev_creature.above = g_creatures[#g_creatures]
						g_creatures[#g_creatures].below = prev_creature
					end
				elseif type == "sponge" then
					-- ...etc...
				end

				prev_creature = g_creatures[#g_creatures]
			end
		end
	end
end
By now you may have realized that some creatures such as jellyfish are actually composites. The root of the jellyfish is one creature, then each tile of stingers is a separate independent ‘creature’ as this makes it easy to have jellies with any number of stingers. However there is some behaviour that groups them together, for example cutting a stinger will also remove all the stingers attached below it. This is why the level is parsed vertically instead of horizontally and why I track the previously spawned creature; jellyfish stingers act as a doubly-linked list to make cutting them easier.
As always you can follow development of the game on Twitter @rhythm_lynx
16 Likes
Hi @melliott.meeka, great question! I’ve been meaning to write a more technical post here for a while so I hope #4: Bootstrapping, menu transitions and level loading answers your question!
4 Likes
Thanks @connor.halford !!! This is fantastic! We really appreciate these blogs. They’ve been super helpful and inspiring.
4 Likes
You’re welcome : ) nice to know people read and appreciate them
2 Likes
Awesome write up and great idea! Thanks for sharing!
Keep it up!
3 Likes
Thanks! : )
1 Like
Thanks! The collection proxy concept it’s always a difficult obstacle to climb for beginners!
But your detailed but simple explanation is perfect in this case.
Keep it up!
3 Likes
You’re welcome, I will!
1 Like
#5: Case anatomy and pixel-perfect rendering
I have just finished the very long and very painful process of making the game handle any aspect ratio and any resolution while remaining pixel-perfect. In the process I added support for landscape layouts and completely redesigned the available case palettes.
Defining ‘pixel-perfect’
[The program I’m using to resize the window is a tool I made called Positive Aspects, there’s a forum thread about it and you can download it for free.]
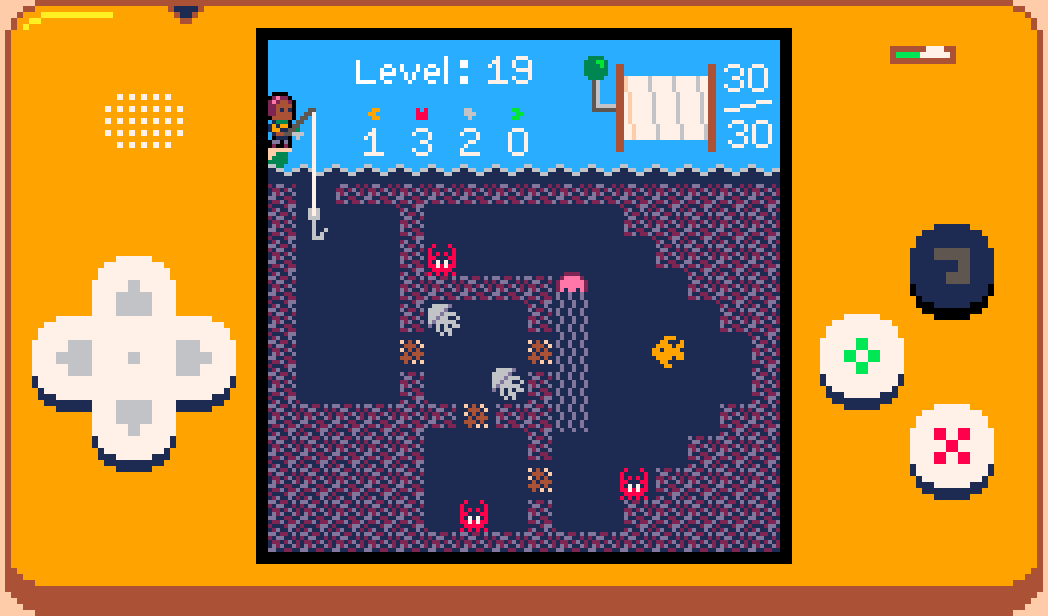
As you can see in the demo above, the game renders correctly no matter what aspect ratio or resolution it is resized to. Generally in the rest of this post I’m going to refer to the section of the window where all the actual gameplay happens as the ‘game’ and the handheld console surrounding it as the ‘case’. I had several criteria to meet:
- The game should always be the largest exact multiple of 128x128 that can fit in the window while still leaving enough space for the case
- On a phone or tablet the game should remain the same size when rotating between portrait and landscape
- Every element of the case should be scaled equally so that it remains internally consistent
- The relative proportions of the case should be flexible to allow the game to be as large as possible
- The size of a case pixel can be different than the size of a game pixel
- The buttons of the case must always be interactable and should never overlap
- No case element should ever overlap the game
- Every game pixel and every case pixel should always be perfectly square
- No pixel should ever be anything other than one of the 16 colors of the PICO-8 palette
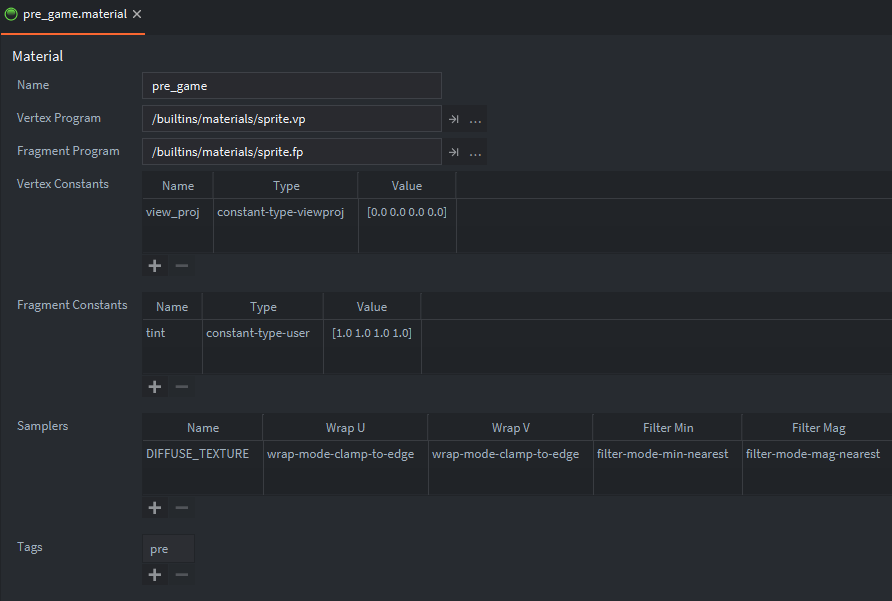
Custom render pipeline
To avoid the complexities of the actual game, I made a separate prototype project with just the case rendering and a 128x128 game screenshot. It took 4 or 5 attempts before I finally got everything working and integrated the prototype into the main project.
I now have a totally custom render pipeline with 3 materials: pre-game, game and post-game. The materials are functionally identical but everything with the pre-game material is obviously rendered first, then game, then post-game. Most of the case is pre-game but the buttons are post-game because if a scenario ever arises where the buttons and game overlap, the buttons should be visible since they’re how you interact with the game. This scenario shouldn’t ever happen other than for resolutions lower than 128 in one or both dimensions, such as this tiny 198x111 window:
To ensure crisp edges each material uses ‘nearest’ min and mag filters and ‘clamp to edge’ wrapping, with border extrusion enabled on the case atlas since sprites with those textures are actually scaled up. All sub-pixel rendering is disabled through the game.project file.
The case elements are sized and positioned to match the window size with (0, 0) at the bottom left corner. No camera manipulation necessary for the case rendering, just simple projection and view matrices and no viewport clipping. The game rendering uses a fixed 128x128 projection matrix and gets the view matrix from a camera moved around the world (as described in devlog #4: Bootstrapping, menu transitions and level loading). The game is placed and sized within the case through manipulating the viewport. The relevant bit of the render script looks like this:
-- setup render state
render.set_stencil_mask(0xFF)
render.set_depth_mask(false)
render.disable_state(render.STATE_DEPTH_TEST)
render.disable_state(render.STATE_STENCIL_TEST)
render.disable_state(render.STATE_CULL_FACE)
render.enable_state(render.STATE_BLEND)
render.set_blend_func(render.BLEND_SRC_ALPHA, render.BLEND_ONE_MINUS_SRC_ALPHA)
render.clear({[render.BUFFER_COLOR_BIT] = col(g_palettes[g_save_data.palette].background),
	[render.BUFFER_DEPTH_BIT] = 1,
	[render.BUFFER_STENCIL_BIT] = 0}
)

-- draw pre-game case elements
local case_projection_matrix = vmath.matrix4_orthographic(
	0, g_window_width, -- left, right
	0, g_window_height, -- bottom, top
	-1, 1) --near, far
render.set_projection(case_projection_matrix)
render.set_viewport(0, 0, g_window_width, g_window_height)
render.set_view(vmath.matrix4())
render.draw(self.pre_game_predicate)

-- draw game
render.set_projection(vmath.matrix4_orthographic(0, GAME_SIZE, 0, GAME_SIZE, -1, 1))
render.set_viewport(g_viewport_left, g_viewport_bottom, g_viewport_size, g_viewport_size)
render.set_view(self.view)
render.draw(self.game_predicate)

--draw post-game case elements
render.set_projection(case_projection_matrix)
render.set_viewport(0, 0, g_window_width, g_window_height)
render.set_view(vmath.matrix4())
render.draw(self.post_game_predicate)
On startup and whenever a resize is detected (including changing device orientation between landscape and portrait) some calculations are run to work out where the game viewport should now be and what size and position each case element should now have. The script responsible for all this is ~800 lines long, but here are some of the top-level functions that handle resizing:
local function pre_viewport_resize_case()
	-- letterboxing
	g_case_bounds.width = g_window_width
	g_case_bounds.height = g_window_height
	local aspect = g_case_bounds.width / g_case_bounds.height
	g_is_portrait = (aspect < BOUNDARY_ASPECT_RATIO)
	if g_is_portrait == true then
		CASE_WIDTH = WIDTH_PORTRAIT
		CASE_HEIGHT = HEIGHT_PORTRAIT
		MAX_SCREEN_HEIGHT = MAX_SCREEN_HEIGHT_PORTRAIT
		VIEWPORT_CENTRE = VIEWPORT_CENTRE_PORTRAIT
		aspect = math.min(aspect, 1 / MAX_ASPECT_RATIO)
		g_case_bounds.width = g_case_bounds.height * aspect
		aspect = math.max(aspect, 1 / MAX_ASPECT_RATIO)
		g_case_bounds.height = g_case_bounds.width / aspect
	else
		CASE_WIDTH = WIDTH_LANDSCAPE
		CASE_HEIGHT = HEIGHT_LANDSCAPE
		MAX_SCREEN_HEIGHT = MAX_SCREEN_HEIGHT_LANDSCAPE
		VIEWPORT_CENTRE = VIEWPORT_CENTRE_LANDSCAPE
		aspect = math.max(aspect, MAX_ASPECT_RATIO)
		g_case_bounds.height = g_case_bounds.width / aspect
		aspect = math.min(aspect, MAX_ASPECT_RATIO)
		g_case_bounds.width = g_case_bounds.height * aspect
	end
	g_case_bounds.width = math.floor(g_case_bounds.width) -- make it integer
	g_case_bounds.height = math.floor(g_case_bounds.height)
	g_case_bounds.width = g_case_bounds.width - (g_case_bounds.width % 2) -- make it even
	g_case_bounds.height = g_case_bounds.height - (g_case_bounds.height % 2)
	g_case_bounds.x = math.floor((g_window_width - g_case_bounds.width) / 2)
	g_case_bounds.y = math.floor((g_window_height - g_case_bounds.height) * 0.3)

	local x_scale = math.floor(g_case_bounds.width / CASE_WIDTH)
	local y_scale = math.floor(g_case_bounds.height / CASE_HEIGHT)
	g_case_bounds.pixel_scale = math.max(1, math.min(x_scale, y_scale))

	for i = 1, #g_case_parts do
		resize_part(g_case_parts[i], (i - 1) / #g_case_parts)
	end
end

local function calculate_viewport()
	-- work out the largest multiple of GAME_SIZE we can fit in the window while obeying MIN_CASE_BORDER size
	local limiting_dimension = math.min(g_case_bounds.width, g_case_bounds.height)
	local best_size = GAME_SIZE * math.max(1, (math.floor(limiting_dimension / GAME_SIZE)))
	if limiting_dimension - best_size < 2 * MIN_BORDER * g_case_bounds.pixel_scale then
		best_size = math.max(GAME_SIZE, best_size - GAME_SIZE)
	end

	-- don't let the size of the game occupy too much vertical space as we need room for the buttons
	while best_size / g_case_bounds.height > MAX_SCREEN_HEIGHT and best_size > GAME_SIZE do
		best_size = math.max(GAME_SIZE, best_size - GAME_SIZE)
	end

	-- calculate viewport
	g_viewport_size = best_size
	local border = (g_case_bounds.width - g_viewport_size) / 2
	g_viewport_left = g_case_bounds.x + border
	g_viewport_bottom = g_case_bounds.y + (VIEWPORT_CENTRE * g_case_bounds.height) - (g_viewport_size / 2)
	g_viewport_bottom = math.floor(0.5 + g_viewport_bottom)
end

local function post_viewport_resize_case()
	local surround = nil
	for i = 1, #g_case_parts do
		if g_case_parts[i].name == "screen_surround" then
			surround = g_case_parts[i]
			break
		end
	end
	if surround ~= nil then
		local id, size
		if g_is_portrait == true then
			id = surround.port_id
			size = go.get("port_"..surround.name.."#sprite", "size")
		else
			id = surround.land_id
			size = go.get("land_"..surround.name.."#sprite", "size")
		end

		local pos = go.get_position(id)
		pos.x = g_case_bounds.x + g_case_bounds.width / 2
		pos.y = g_case_bounds.y + g_case_bounds.height * VIEWPORT_CENTRE
		go.set_position(pos, id)
		surround.position = pos

		local scale = go.get_scale(id)
		scale.x = (g_viewport_size + 2 * SURROUND_SIZE * g_case_bounds.pixel_scale) / size.x
		scale.y = (g_viewport_size + 2 * SURROUND_SIZE * g_case_bounds.pixel_scale) / size.y
		go.set_scale(scale, id)
	end
end

local function resize_case()
	pre_viewport_resize_case()
	calculate_viewport()
	post_viewport_resize_case()
end
To avoid floating point rounding issues and ensure pixel-perfect rendering it was crucial that all x/y positions and scales ultimately end up as integers. The second parameter passed to resize_part is the z-coordinate for each case element: (i - 1) / #g_case_parts. The g_case-parts table is a long list defining the size, position and color of each case element listed from back to front. Setting the z coordinate of each element appropriately in the collection would have been extremely error prone and time consuming; setting it programmatically makes it trivially easy to add and remove case elements as the design was iterated. By hiding elements above a certain z value it also made it fairly easy for me to create this visualisation showing the overall back-to-front render order, with pre-game elements followed by game elements followed by post-game elements:

Case anatomy
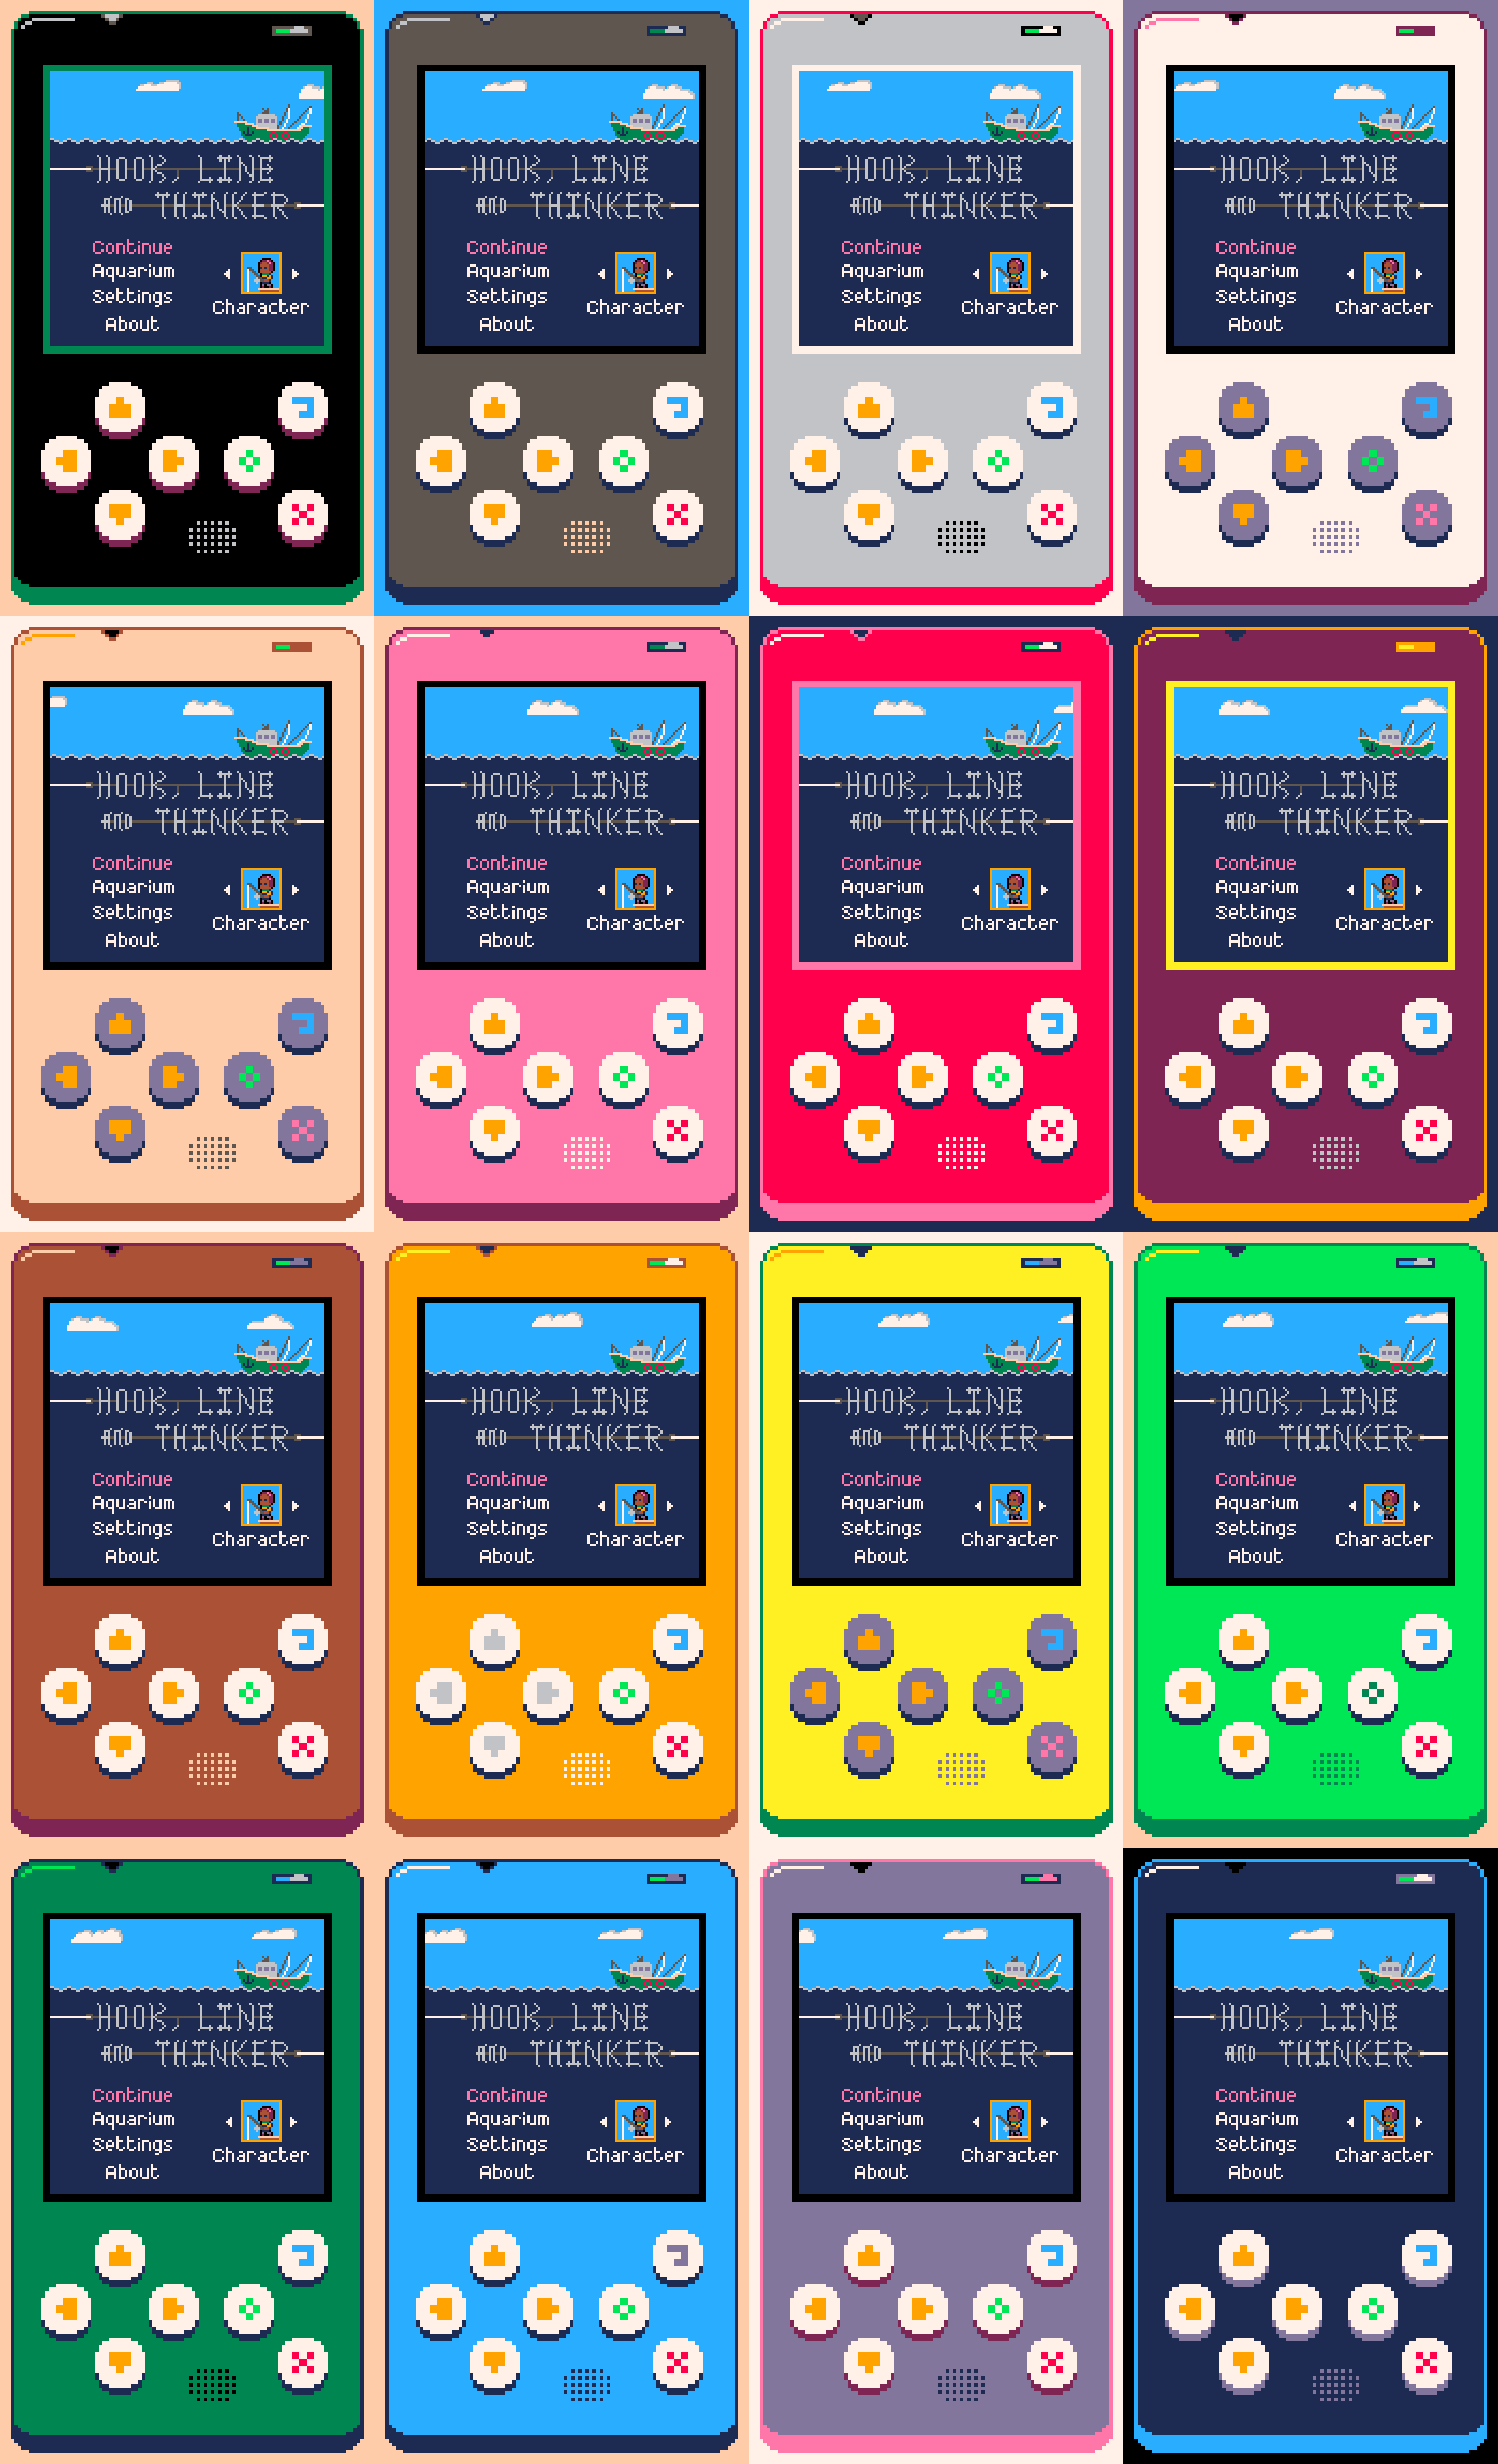
The case is made of ~60 pure-white sprites pixelled at a resolution of 160x90 and arranged in landscape and portrait layouts. There is some redundancy here from several iterations of the case design. If the aspect ratio (width ÷ height) is less than 1 then the portrait layout is enabled and resized, otherwise the landscape one is.
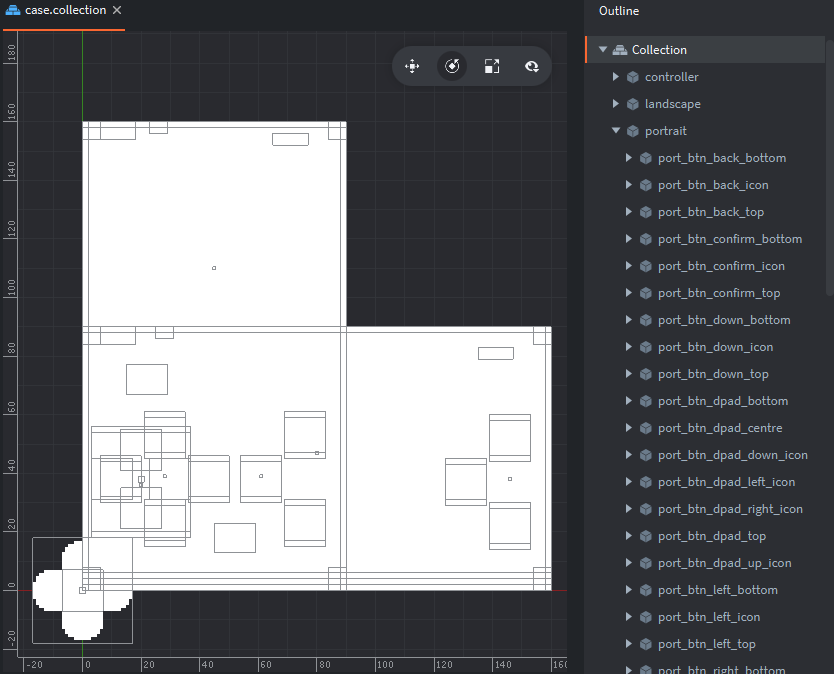
The reason all the sprites are pure-white is because players can choose one of 16 color variations, one with a base color for each of the 16 colors in the PICO-8 palette. I had to condense the arrow buttons into a d-pad for the landscape layout in order to keep the game centred.
![]()

The result
In total this was around 4 months of work and the game should now render correctly and be fully playable on every device in any orientation, including all future devices with whatever weird resolutions and aspect ratios the device manufacturers throw out next. If that sounds like a long time, bear in mind that I have a full-time job and can only work on Hook when time/energy permits (typically weekends). One month of that time was spent making the Positive Aspects tool; it does more things than I strictly needed it to do but it’ll be useful for every future project, plus completing and releasing a smaller project was a great motivator when returning to The Big One.
Twitter: @rhythm_lynx
23 Likes
Really impressive and inspiring, @connor.halford – once again, thanks for sharing your progress 
4 Likes
Really good job @connor.halford ! How did you solve the issue on windows resize (that brokes the GUI nodes alignment respect the on_input action.x~y)?
I’m experiencing similar issue, in a very simple GUI layout
1 Like
Hey, thanks. I’m not actually using Defold’s GUI system at all, everything is just sprites in a collection. I mentioned above that it took 4 or 5 attempts to finally get everything working, several of those involved the GUI system but I could never get it to do exactly what I needed. Typically UI assets are high resolution then scaled down, but for me everything is at a tiny resolution* and massively scaled up. I needed complete control and wrestling with automatic layouts just wasn’t worth it.
*Fun fact: I can fit every single texture in the project, including every bit of baked localization text in all 12 languages, into a single 2048x1024 texture with about a fifth still empty.
12 Likes
#6: Undo
There is a single dedicated button in Hook which required a massive code refactoring and ate several months all by itself: undo.
Design evolution
In the original 6-day jam version of the game there was no undo at all. In response to a comment asking about it, I wrote:
No, you have to reel it all the way back in. This was done intentionally to discourage players from brute-forcing the solutions and instead force more thoughtful, slower, confident movement. It is a little punishing at first though, or when you inevitably hit the wrong key by mistake.
5 months after I started the Defold version (7 months after the jam) I added a limited undo which allowed players to correct basic movement mistakes. Each move you made (including hooking a creature) could be individually undone, but once you reeled something in you were committed and the only way to undo that would be to restart the level.
Another 7 months later and I knew it was time for the full, complete undo. All the difficulty should be in understanding how the systems work together and working out how to exploit those to do what you want to do. Once you have a plan, executing it should be easy. The goal was that you could play any level all the way to the end and then as you’re reeling in the final creature hold down the undo button and watch the entire thing play in reverse right back to the very beginning. Undo is free and unlimited in every level.
Gameplay code
As I write this Hook currently consists of around 5500 lines of Lua spread across 31 .script files and 1 .render_script. Two files are primarily responsible: hook.script has 1121 lines, with gameplay_events.script following at 767. These two files are where the game is. (They are closely followed by case.script at 759 lines, which handles everything the previous devlog was about).
Since my game is completely deterministic there were just two simple requirements for full undo: an input counter and an event log. There is (almost) a one-to-one relationship between the number of button presses it takes to do something and the number of undo button presses it takes to undo all the effects of those button presses. This is where the input counter comes in. Whenever a viable move or reel button is pressed we increment the input counter and trigger the relevant gameplay events. Whenever undo is pressed we undo all the events that occurred as a result of the most recent input number and then decrement the input counter. This is how pressing one button like ‘reel in’ can result in dozens and dozens of gameplay events over many frames (e.g. reeling the hook in, pulling a creature along, cutting seaweed, etc) but then one press of ‘undo’ backtracks the whole sequence.
There are currently 18 types of event and each has an add(), an execute() and an undo() function; these and the top level undo() function are what makes up the gameplay_events.script file. The hook.script file is responsible for calling the relevant add() functions or the top level undo() at the right times. Each add() function adds a new table element to the event log which stores all the data necessary both to execute() and undo() the event, then immediately calls execute(). Here’s one of the simpler examples:
function add_grab_creature_event(hook, creature_index)
	local event = {}
	event[1] = EVT_GRAB_CREATURE
	event[2] = g_input_count
	event[3] = creature_index
	table.insert(g_event_log, event)
	execute_grab_creature_event(hook, event)
end

function execute_grab_creature_event(hook, event)
	hook.hooked_index = event[3]
	hook.func_start_reaction(hook, "exclaim")
	msg.post("#sprite", "disable")
	msg.post("main:/audio", "play_sfx", { sound = "grab_fish" })
end

function undo_grab_creature_event(hook, event)
	hook.hooked_index = -1
	hook.func_hide_all_reactions()
	msg.post("#sprite", "enable")
end
The hook.script always passes itself into the add() function along with any data specific to that event. The first element in the event table is always the event type, the second is always the input count. After that each event has its own structure depending on what data it needs, though they all use simple numerical indexing to avoid string overheads. As you can see all the actual data/state changes (setting the hooked_index, playing a reaction animation, disabling the hook sprite) occur in the execute() function, with the undo() function doing the reverse of each operation.
Here’s the top level undo() function called when the button is pressed:
function undo(hook)
	if g_input_count < 1 or #g_event_log < 1 then return end
	while #g_event_log > 0 and g_event_log[#g_event_log][2] == g_input_count do
		local event = g_event_log[#g_event_log]
		if event[1] == EVT_MOVE_HOOK then			undo_move_hook_event(hook, event)
		elseif event[1] == EVT_REEL_HOOK then		undo_reel_hook_event(hook, event)
		elseif event[1] == EVT_GRAB_CREATURE then	undo_grab_creature_event(hook, event)
		elseif event[1] == EVT_REEL_CREATURE then	undo_reel_creature_event(hook, event)
		elseif event[1] == EVT_START_REELING then	undo_start_reeling_event(hook, event)
		elseif event[1] == EVT_FINISH_REELING then	undo_finish_reeling_event(hook, event)
		elseif event[1] == EVT_DROP_CREATURE then	undo_drop_creature_event(hook, event)
		elseif event[1] == EVT_SPAWN_SKELE then		undo_spawn_skele_event(hook, event)
		elseif event[1] == EVT_BREAK_DEBRIS then	undo_break_debris_event(hook, event)
		elseif event[1] == EVT_SQUID_INK then		undo_squid_ink_event(hook, event)
		elseif event[1] == EVT_SPONGE_INK then		undo_sponge_ink_event(hook, event)
		elseif event[1] == EVT_PATROL_MOVE then		undo_patrol_move_event(hook, event)
		elseif event[1] == EVT_PATROL_TURN then		undo_patrol_turn_event(hook, event)
		elseif event[1] == EVT_PATROL_HIDDEN then	undo_patrol_hidden_event(hook, event)
		elseif event[1] == EVT_PATROL_LOCK then		undo_patrol_lock_event(hook, event)
		elseif event[1] == EVT_PATROL_UNLOCK then	undo_patrol_unlock_event(hook, event)
		elseif event[1] == EVT_CUT_STINGER then		undo_cut_stinger_event(hook, event)
		elseif event[1] == EVT_CUT_SEAWEED then		undo_cut_seaweed_event(hook, event)
		end
		table.remove(g_event_log, #g_event_log)
	end
	g_input_count = g_input_count - 1
	msg.post("main:/audio", "play_sfx", { sound = "undo" })
end
All the events which occurred as a result of the most recent input are undone in reverse chronological order (since events are added and executed in chronological order). Then the input counter is decremented.
The engineer in me wants to move this whole system to C and really optimize the data storage, but I almost certainly won’t unless I do some profiling nearer to launch and discover a big problem. The difficult part of this refactor was just working out all the places where relevant data changes occurred, why, and what other data was necessary to allow those changes. The game remained playable throughout though since I just worked my way through each gameplay interaction one by one, refactoring and testing and committing as I went, until I could undo every level all the way back to the beginning and everything was back to where it started.
One exception
I said earlier that there is almost a one-to-one mapping between action button presses and undo button presses. When you reel in with nothing hooked, the input counter is incremented so that you can undo that action and return to where you were. However once you’ve hooked a creature there is nothing you can do other than reel it in, so it stands to reason that whenever you want to undo reeling in a creature you also want to undo hooking it. So when you reel in with something hooked the input counter actually isn’t incremented, meaning that when undo is pressed it will undo everything that occurred as a result of reeling in the creature, as well as the hook movement that caused the creature to be hooked in the first place.
This can be seen in the gif below. When the hook is above the crab and reels in there is nothing hooked, so one action input (reel in) matches one undo input. From there it takes three action inputs (down, down, reel in) to reel the crab in and smash the debris, but only two undo inputs to get back to the spot above it.
Replay
Theoretically the event log is all I need to play back the player’s solution. The log could be parsed to remove pointless inputs such as moving then reeling in without hooking anything, or dropping a fish at A then B then back at A. The log could then be iterated through and executed at a steady rate to show the player the ideal version of their personal solution to the puzzle. With such low resolution and only 16 colors I could even record very long gifs at very small file sizes. This is very much a stretch goal, but it would be pretty cool to let people share their progress.
As always you can follow me on Twitter @rhythm_lynx.
12 Likes
#7: Design iteration: player movement
In this game all you do is move and reel back in. Sound simple? Making games is hard.
A couple of caveats for the days per version listed here. It’s a rough estimate based on days where there’s a relevant commit in the log, but some commits represent several days of work, often there are many tweaks done later which are bundled under other commits, I may have been working on other stuff too, and some of these were weekend / full days while others were just evenings after work. Still interesting though.
Version 1: Moving and reeling in (4 days, October 2016)
According to the daily devlog I wrote during the week-long game jam, I had movement working on day 1; collision on day 2; reeling in the hook on day 3; and reeling in creatures on day 5. When you pushed the reel-in button you were committed to reeling all the way in, with no way to stop it or undo your action. This was particularly annoying on puzzles which require you to drop creatures since you had to wait for the hook to reel all the way back in before moving it again.

My thinking at the time was that by making every move matter it would ̶e̶n̶c̶o̶u̶r̶a̶g̶e̶ force players to think through their actions before taking them, rather than using trial-and-error to fudge their way to a solution. I think there’s several issues with that reasoning. For one thing, I don’t explicitly tell the player anything about how to play, instead using level design to prompt players to work things out for themselves through experimentation. Making every move matter is directly opposed to this, causing players’ introduction to the game to be needlessly punishing.
In my opinion, as designer it is not my job to prescribe how players play my game. It is my job to prescribe what they’re trying to do and what tools they have to accomplish their goals (which they may have even set themselves). If someone wants or needs to trial-and-error their way through a puzzle that is a perfectly valid way of playing the game. Do I think that’s the most enjoyable way to play? No. Does the design facilitate such a playstyle anyway? Yes. Encourage it? Early on, yes. People learn through mistakes and using trial-and-error is a great way to make a lot of mistakes fast. Through this experimentation players will (hopefully) start to understand the mechanics of the game and gain the ability to reason about and predict the effects of their actions before making them (consistency is key here). At this point the player transitions from trying to complete the level to trying to solve the puzzle.
Version 2: Limited undo (1 day, May 2017)
After initially being opposed to any undo at all, my design thinking changed over time and eventually landed on unlimited unrestricted undo. This was the first step towards that: you could undo your movements up to grabbing a creature, but once you reeled it in there was no way to cancel it or undo the effects other than to restart the level.

This was better than no undo at all but the restrictions immediately felt frustrating and arbitrary. As a player I felt a little more free and relaxed about my movements, because a misjudged or accidental button press was no longer a loss of progress (prior to this an error meant at best reeling in the whole line to play it out again, at worst having to restart the entire level). Around this time I added full undo to my todo list.
Version 3: Interrupting an empty reel-in (1 day, October 2017)
This was another way for the player to recover from a misclick. I showed the game to a couple of friends and noticed that they sometimes reeled the hook in after getting adjacent to a creature but not actually grabbing it. They would immediately realise their mistake and jab at the movement buttons in a panic, trying to recover their lost progress as the hook wound its way back to the start. Cue frustration and helplessness.

Once I added this I used it constantly as a way to explore levels; approaching something from one side, then reeling in partially and approaching it from another. It increased my options as a player and made stress testing levels for broken solutions easier. My only concern was that it potentially made patrol fish trivial. Patrols move when you move and the intent was that you’d have to outsmart them by creating a trap with your line. They were the most frustrating part of the game because you often knew how and where you wanted to trap them, but when you got there you were out of sync with their movements and couldn’t execute your plan through no real fault of your own, instead having to resort to reeling in and trying again until everything happened to line up. Being able to resume movement after reeling in meant you could now sort of wiggle back and forth on the spot while they moved into place. This issue with patrols stood for well over a year; we’ll come back to it later.
Version 4: Full undo (~8 days, January 2018)
Freedom, at last! As a player I finally have no reservations about trying different approaches and playing with new mechanics to see how they work. It feels liberating.

At this point I thought the movement was done and was confident that unlimited unrestricted undo was a smart decision for this game. That’s handy because it was a lot of work!
Version 5: Auto-stopping the reel-in when you drop something (~2 days, November 2018)
There were two things that motivated me to make this change. A few months prior I was able to do some proper playtesting and saw that absolutely no-one understood that pulling a patrol through seaweed would cause you to drop it. I considered ditching the mechanic but was focused on other tasks for the time being. The second was the realization that most of the time after dropping something the next move you want to make is somewhere in the vicinity.

This felt very strange at first; it changes the rhythm of the game and felt like it was interrupting the flow. It successfully highlights the fact that you drop patrols on seaweed, because it stops you and forces you to realise it (dropping something is the only thing that automatically stops the reel). I had to add a locking mechanic to patrols to prevent the one you dropped from moving until the hook comes to rest, because if it isn’t where you left it then it’s unclear what happened. In some cases the hook was left in a position where the route I wanted to take was blocked by the line so I would have to awkwardly press the reel-in button again to backtrack before moving forward. Sound familiar?
Version 6: Backstepping (1 day, January 2019)
Hopefully the final piece of this designer-facing puzzle is to allow the player to backtrack one step at a time. This had been possible for more than a year through the awkward process of pressing the reel-in button then almost immediately pressing a directional button. I’ve made strong, conscious design decisions throughout the project to avoid any kind of real-time requirements for players and hated that a reaction-based mechanic had essentially been introduced. As a player I was doing this because it allowed me to more easily achieve my goals. It was time to add another tool to the toolbelt!

And that is where movement stands today (February 2019). My concerns about this making patrols easier to catch proved true, but I now consider that a good thing. I want all the difficulty to be in working out what what you need to do, not in executing your plans.
Version 7: ???
Judging by this track record I’m due to change something about the movement around October 2019, then January 2020 (No, I don’t plan to still be working on this game in 2020!). I haven’t played enough of the game with the auto-stop and backstepping to be totally confident about them, but they solve a lot of design issues so I reckon it’s just that I’m not used to it yet. Hopefully it feels good to move now and isn’t frustrating! I think the button visuals help with the feel too, especially that d-pad *pats self on back *.
I hope this look at the design evolution for such a seemingly simple mechanic gives some indication of the interesting, sometimes difficult problems I’m encountering along the way. For those who are eager to play, I hope I’ve garnered a little more of your valuable goodwill and patience. Believe me, I want this game to be finished more than anyone.
Follow me on Twitter @rhythm_lynx
13 Likes
Again, amazing writeup! Thx!
5 Likes