Recently on discord there was a question about how to make a scrolling animated texture in defold. So I wanted to make a short tutorial to cover this basic yet powerful effect. Scrolling textures via shader is a staple in many shader effects , so lets make one. I put together an example project so those interested can follow along and try it out. The method we will use is UV offsetting using a constant in the shader.
https://github.com/FlexYourBrain/Texture_Scrolling_Example
Also put a demo of the example project on itch for those that would like to see the result of this short tutorial/guide.
(Click to play Demo on itch )
Defold supported graphics api can be found here: The render pipeline in Defold
In this short tutorial/guide the method for scrolling textures should work for most, if not all the graphics api but I have not tested to know for sure.
Lets begin - The project is setup with a subdivided 3d plane (glb) this will be used to display the scrolling texture , assigned the .glb to a model. Two small texture .png images that are 64x64 pixels in size and created to seamlessly tile and are assigned in the .model properties. A shader (Material + Vertex Program + Fragment Program ) that is assigned to the plane model. A constant set in materials and the shader, and also a .script we attached to the model game object that we use to start an animation loop.
∙ Model setup
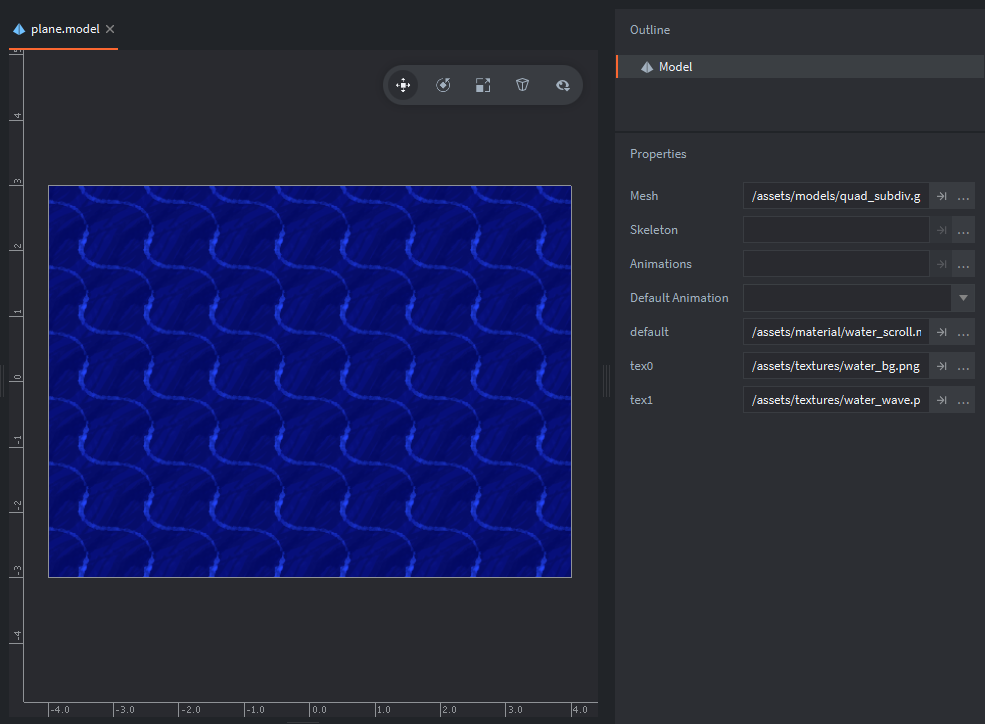
Note: water_bg is assigned to tex0 slot and water_wave is set to tex1 slot. Two sampler slots are assigned in material sampler properties shown below.
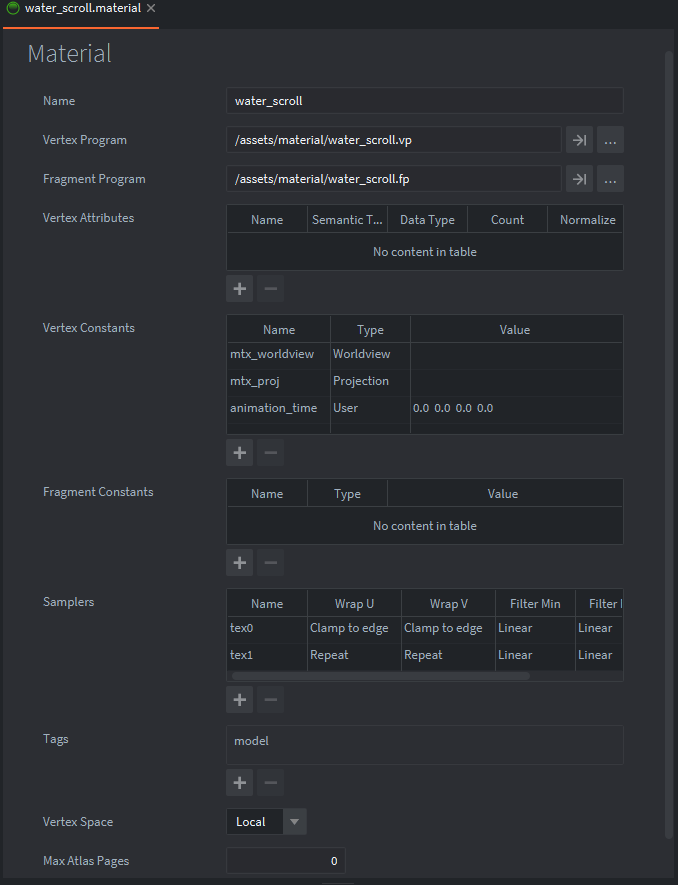
Currently tex1 will be the texture that will be scrolling so Wrap U & V are set to Repeat.
That is the basic setup and now we can move on to the water_scroll.vp(vertex) and water_scroll.fp(fragment) programs. You can see in the image above these are set to the material.
It’s good practice to avoid doing to much calculations in the fragment program if you can avoid it so we calculate the UV offset in the vertex program before the coordinates are sent to the fragment program. We also create a constant “animation_time” with type user to the vertex constant properties set in the material (as seen above). The constant is a vector 4 but we only use the first value. If we denote this vector 4 as vector4(x,y,z,w) we will only use x value in the shader as shown below.
water_scroll.vp
#version 140

uniform vertex_inputs
{
    uniform mat4 mtx_worldview;
    uniform mat4 mtx_proj;
    uniform vec4 animation_time;// vertex attribute set up in material as type float.
};

// UV / Texture Scroll
in vec4 position;
in vec2 texcoord0;

out vec2 var_texcoord0;// setup var texcoord 0
out vec2 var_texcoord1;// setup var texcoord 1

void main()
{
    vec4 p = mtx_worldview * vec4(position.xyz, 1.0);
    gl_Position = mtx_proj * p;

    var_texcoord0 = texcoord0;
    var_texcoord1 = vec2(texcoord0.x - animation_time.x, texcoord0.y); // Calculate var texcoord 1 uv offset on U(x) axis to fragment program
}
The model supplies the attribute texcoord0, this is our texture UV coordinates. We declare our vec4 uniform named animation_time and we also have two vec2 varying texcoords 0 and 1 which we pass these to the fragment program after we assign them the attribute UV coords “texcoord0” in void main(). As you can see var_texcoord1 is different because this one we are offsetting before it is sent to the fragment program. Assign a vec2 so that we can supply animation_time to the x and y separately if we want. In this case we only take texcoord0.x and subtract our constant animation_time.x which when animated will offset in the negative U axis (horizontal left), we set texcoord0.y to keep its attribute position. EZ PZ!
water_scroll.fp
#version 140

in vec2 var_texcoord0; // var texcoord 0 used with water_bg sampler
in vec2 var_texcoord1; // var texcoord 1 used with water_waves sampler, UV animation calulation done in vertex program

out vec4 color_out;

uniform sampler2D tex0; // Material sampler slot 0 = water background / set in plane.model
uniform sampler2D tex1; // Material sampler slot 1 = water waves / set in plane.model

void main()
{
    vec4 water_bg = texture(tex0, var_texcoord0.xy);
    vec4 water_waves = texture(tex1, var_texcoord1.xy);
    // add texture waves to bg using addition(+), alpha set to 1.0 as there is no transparency being used0
    color_out = vec4(water_bg.rgb + water_waves.rgb, 1.0);
}
Now to the fragment program, we have a simple setup. Two “in” varying vec2’s that we sent from the vertex program var_textcoord0 and var_texcoord1 and then we supply uniforms for the sampler textures we set in our model and material they are named tex0 and tex1. Then in void main() we create vector 4’s to assign to our textures using texture2d() , the images are in RGBA(red,green,blue,alpha) channel format. We assign sampler name and then the texture coordinates we want them to use. As you see in the image above “water_waves” has var_texcoord1 assigned. this is the texture we are animating/scrolling and var_texcoord0 assigned to water_bg we left as is. For the global reserved variable “gl_FragColor” this is where pixel colors are assigned with the same vec4(r,g,b,a) format. We want to combine the 2 textures together so we use addition to mix the rgb channels of each texture together, also we are not using the textures alpha channel so we assign a float value of 1.0 which equals full opacity.
animate_shader.script
local animate = 1.0
-- local float will be used to set animation_time constant in scroll material , only x constant value is used in the shader
-- so there is no need to create a vector 4

function init(self)
	go.animate("/scroll#plane", "animation_time.x", go.PLAYBACK_LOOP_FORWARD, animate, go.EASING_LINEAR, 4.0)
end
There are more than one ways of animating constant values, you can calculate delta time steps and update the constant with these values in the render script or a normal script if you wanted to. In this case we are only animating one shader and if you wanted a time step in several shaders calculating in an update() might be more ideal . However we will use go.animate because we have a lot of functionality at our disposal , we can animate just the x value of our constant using “animation_time.x” we also have duration, delay and easing to play with if we so choose. We can also set playback to loop or play once and cancel the animation if we needed to. These all come in very handy when animating our shaders. The local float 1.0 is our target value we are animating in the animation_time.x, in shaders for the most part we deal with normalized float values 0.0 to 1.0. Notice the default constant values in the material for our animation_time is (0,0,0,0) we are animating the first zero from 0.0 to 1.0. Nice , this means our offset UV coords will animate to the edge and then loop again over and over, this is exactly what we want.That should be it!
As an exercise, if you are up for it. In the project you can animate the water_bg texcoords in the opposite direction like I did in the example demo! Hope this helps and apologies if I am not as clear on certain aspects of this short tutorial as I should have made it. If you do make something scroll please share!
Cheers ~ ![]()
- Tutorial and project files updated SPIR-v compatible GLSL code