Texture Management in Defold

This post is for beginners of mobile game dev and aim to inform about the different areas of how to work with textures in defold. A lot of the number presented in this post are ballpark numbers and should only be seen as a recommendations, not law or fact.

Makeshift Table of Content

  1. This post
    • Texture profiles
    • Atlases
    • Hardware compression
    • Texture size
  2. Common problems
  3. Atlas properties
  4. Resizing Images
  5. Optimizing

Texture Profiles

The texture profile is only used when you bundle your package, if you are using “build and run” it will not compress your textures, however if there is an error in the profile it may make the build unable to run, or fail to load that atlas. This is also true if you use anything else than your local computer as a target.

Profiles

Texture profiles are covered very thoroughly in the documentation so if you want all information read about it here http://www.defold.com/manuals/texture-profiles/

Platform
Dictates which platform the profile should be used for it is quite self explanatory but it is worth mentioning that the OS_ID_GENERIC is used on all platforms, this means that if you uses OS_ID_IOS and OS_ID_GENERIC your build on IOS will now contain both OS_ID_GENERIC and OS_ID_IOS. Remember that you platform you pick should support the format, OS_ID_GENERIC with a hardware format will not work.

Formats
Dictates which channels should be included and if you are using an hardware compression, it is essentially how much memory the images will consume. RGB means that the alpha will be discarded, if your images uses alpha and you use this compression where there was alpha before there will now be black. If you images have alpha you want something that have RGBA.

LUMINANCE is a grey scale image so it only uses one channel, if you put in an image with RGB values in an atlas with this format the color of each pixel will be calculated with (something along the line of) 0.3R+0.59G+0.11*B this is to represent the colors in a way that takes how the eye works in account.

PVRTC is a hardware compression format for PowerVR GPUs, main usage is for iOS. There are two alternatives for it 2BPPV1 (2 bit mode) or 4BPPV1 (4 bit mode).

ETC1 is a part of the OpenGL ES graphics standard extensions and is mainly used for Android. Note that there are no support for alpha with the ETC1 format.

Compression Level
This is the quality you want the texture to be at. The higher the better, the only trade of I can think of here is build time, I have noticed this especially on hardware compression. I have seen changing the compression_level on hardware compression texture from NORMAL to HIGH makes the build go up from 8 minutes to 30 minutes. HIGH compression level isn’t supported with WEBP_LOSSY either.

Compression Type
Decides what compression we want, this is can give a good impact on your package size. You only have 3 choices, DEFAULT, WEPB and WEBP_LOSSY. WEPB is a texture format like JPEG or PNG, it is developed by google and are in my mind vastly superior to both PNG and JPEG. WEB is the equivalent to PNG and WEBP_LOSSY that of a JPEG, but a WEBP texture is a lot smaller on disk than JPEG or PNG. The DEFAULT uses a LZ4 compression, and there is (as far as I have seen) never a good reason to use that over WEBP as WEBP is smaller on disk and the quality is so similar I can’t really notice any difference. Here is a good comparison of WEBP and PNG/JPEG.

Mipmaps
If this is true the engine will embed mipmaps into your atlases if you don’t have problems with your textures you can turn it off and save some space on disk.

Max Size
Scales your texture down if it the atlas size goes over this value. If your atlas is 4k and this value is 2k it will be scaled down to fit it. But it does nothing if your atlas is smaller than the value set here. This is a good way to make sure your textures doesn’t go over your maximum supported texture size.

Path Settings

There is not much to say about the path settings, it uses glob paths and the atlases gets compressed in the order they are set in. Meaning that if you have a generic glob that hits every atlas then that will compress it with that profile even if you further down have specified a setting that will hit that atlas again.

My Recommendation

If you want to keep it simple use a profile with OS_ID_GENERIC and cap your textures to 2048x2048, use RGBA with WEBP at BEST, if you notice slow build times set it to NORMAL, if you want a smaller package use WEBP_LOSSY at HIGH. Set mipmap to false to save in some package size. Use a path that hits every atlas in your project.

game.texture_profile
path_settings {
  path: "/**/*.atlas"
  profile: "atlas_profile"
}
profiles {
  name: "atlas_profile"
  platforms {
    os: OS_ID_GENERIC
    formats {
      format: TEXTURE_FORMAT_RGBA
      compression_level: BEST
      compression_type: COMPRESSION_TYPE_WEBP
    }
    mipmaps: false
    max_texture_size: 2048
  }
}

Atlases

In Defold we use atlases also know as sprite sheets, it is preferable to have an understanding of why we use them so we can work with them in a way that is optimized and works with us not against. If you want to learn more in depth about the theory I recommend you to read “Improved Batching via Texture Atlases”, available from NVIDIA’s developer site. For a brief overview I recommend Code and Webs video on it.
The basic theory is that we combine a lot of different textures into one big texture this greatly reduce the amount of calls that is made to the renderer, if we have anywhere from 2 to 200 different textures in a single atlas. This means that you have 2 to 200 less texture states changes per frame. With mobile gaming we have some very harsh restrictions on us from the hardware¹, one of them is that textures needs² to be power of two (8, 16, 32, 64, 128, 256 etc). If we have a sprite that is 140 x 140 pixels we need to fill up the space until it is the closest higher power of two. Meaning until it is 256 x 256 and we will have to do this for all images. Creating a lot of “dead space” used for nothing but taking up space and memory. Hence we pack them together into a big texture atlas.

Packing

As you now know texture atlases are used mainly for performance gain, to reduce the amount of batch/draw calls needed. We should therefore create atlases of textures that are used together. With that in mind the “in game hud”, “pre level hud” and “game tiles” should each be one atlas. We do this because we don’t want to read textures from the “game tiles” atlas when we are on the map, even if we only use a texture that is 1 pixel from the “game tiles” atlas while we are on the map we need to have the whole texture atlas in memory. This can make it useful to sometimes have the same texture in more than one atlas, for instance if you use the same button in the level and outside, placing that one button in both atlases will make us able to only load one of the atlases.
Another gain with packing files together that are used for the same purpose is that we may want to compress them the same way. For instance maybe we want the HUD in a fairly good quality because we know the user will focus on it a lot, but also know that the backgrounds the user will mostly ignore so we can have a harder compression on them. So we do not want to group backgrounds and the HUD for this reason. If we have a lot of textures that doesn’t use alpha we may want to group them together also, because then we don’t need to include the alpha channel in the texture and thus save some space and memory.

Resolution

Max size of the atlas is decided mostly by what device you want supported. The limit on the older iThouches, Original iPhone and iPhone3G is 1024x1024. Anything above that (iPhone 3GS+) supports 2048x2048, newer devices supports higher resolutions.
The hard-cap for the minimum size is 64x64 but remember the reason to use atlases in the first place, that small texture could probably be placed into a different atlas.

Memory

The cap for a the amount of texture atlases is almost more dependent on the package size than the memory – presuming that the atlases is used the right way and you don’t have the whole game loaded into memory at all times. Because we preferably want to support older iOS devices the game will need to run on a device with 512 MB memory (iPhone 4). The “safe value”³ for how much memory our app can take seems to be about 45-50% of the memory of the device, that makes it about 200 MB on the low-end iOS devices, remember that the memory can spike if you for example use a lot of popups and such, making you consume more memory than you think. If you notice you are memory capped⁴ on iOS look towards either reshuffle your images to more effectively use your atlases or consider using PVRTC as they are easier on the memory.

Hardware compression

I have mentioned hardware compression a few times now and if you have not heard it before you are probably wondering what this refers to. A JPEG or PNG uses a compression that compresses the images depending on how it looks so it have a varying size, a hardware compression always uses the same amount of bytes for images of the same size. To put it short (and probably not clear anything up) a hardware compression is a compression that uses a fixed-ration block based scheme for compression, making it easier for random access of a pixel. This Stackexchange post explains it fairly well. The thing to remember is that a hardware compression is a lot smaller in memory, but it is (probably, depends on the image compressed) bigger on disk than other none hardware formats.

Texture Size

When deciding the target resolution of your game you should take into account which is your lowest supported device, do you value disk space or graphical fidelity. Generally I personally want to make it look good on a iPad but this doesn’t mean that I make my textures “pixel perfect”, the user often doesn’t notice if textures are not 100% crisp. The best way to find a good number is to just make an crisp image of let us say 960×640 (resolution of the iPhone 4S) and see how it looks on different devices, if you are not happy with the result than increase it. Of course you should test this out before you start implementing all your art, if you don’t have a lot of devices to test on and want to support iPads and the like I would say go for a bit bigger size maybe something like 1280x720. But the best way is definitely to try it out and see what works for your games art style.


Hope it was a good read, let me know if there are any mistakes or if you have questions.


¹ This is not the case for ALL hardware but because some of them have it and the game needs to run on that particular device that makes it a restriction we always have to follow.
² This is not always true for Android but it is for iOS.
³ This is just a pall park value, the game is a lot more than textures. Sounds, scripts, the actual engine and a lot more. I have heard of some games putting restraints on themselves not to use more than 100 MB for texture memory.
⁴ This is easy to notice as iOS shuts down you app if you run out of memory.

27 Likes

Common problems with textures

While we are on the topic of textures here are some common problems and how to fix them

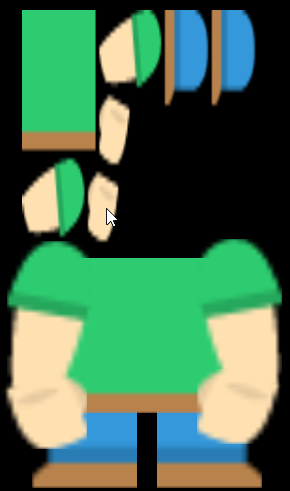
Weird edge lines and texture seams

A common artifact is that your sprites can seem to have a weird edge (open image in new tab to see the problem)

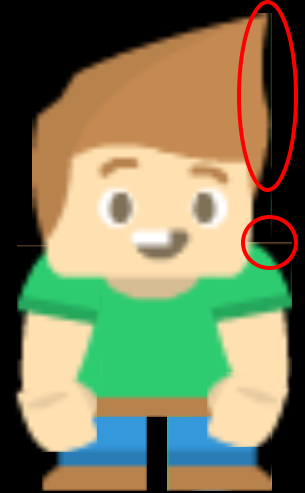
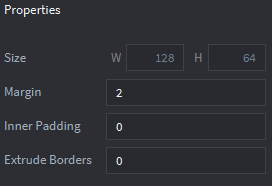
This is easily resolved by increasing Margin or Extrude border on the atlas, you will get different result depending which you increase, generally I have found a better end result with Margin as extrude border tends to give a tiny edge artifact still. If you increase the any of the properties it is generally better to do it in even numbers because if you scale the size of the atlas down with the texture profile it could introduce some small errors.

Color noise and broken looking texture

This is less common but when I first saw it it took a while to track down what was the cause.

The cause is that you can’t have images that uses 16 Bits/Channel, so to fix it you have to convert the image. Either in your image editing software or with something like imagemagick.

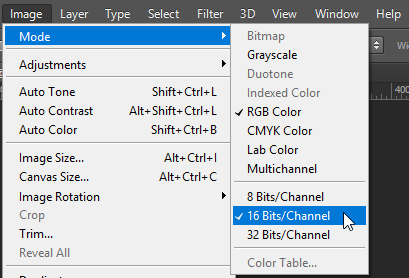
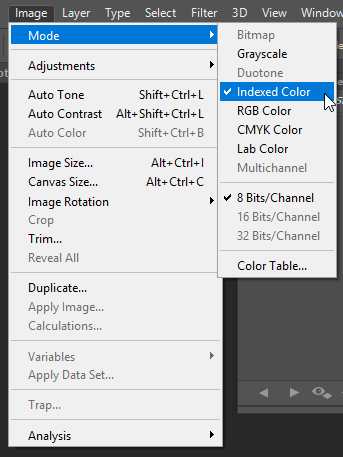
Image get’s corrupted with black and white

I have gotten this after downloading and saving images with Python.


The cause is that you can’t have Indexed Color, so to fix it you have to convert the image. Either in your image editing software or with something like imagemagick.
2019-03-31%2012_00_22-Window

Atlas is set as a texture

This one is easy to see and easy to track down, but worth mentioning anyway.

It looks like one texture have been replaced completely with an image of the atlas. I think this only happens on spine scenes and it gives no error at all. To fix it you only have to add the missing texture to the atlas.

20 Likes

Great material! Thank you.
I tried to set WEBP and BEST instead of default, result for my app:

Not bad ) I can add a few more natve plugins and save same build size)

I installed both app (one with default and other with webp) and can’t find a difference on ipad with retina.

It’s just a bonus without any any bad affects (load speed, artifacts in gradients etc) ?

4 Likes

Yep! As far as I can tell with my testing WebP and Default looks and behaves the same, I have not noticed any load speed decrease/increase and neither have I seen any artifacts on a WebP texture that wouldn’t be present if it was set to Default. As far as I can tell for all intents and purpose WebP have only benefits over the Default compression. But I can not be sure because I didn’t make the engine, maybe someone on the engine team have a comment about if this is true or if I have missed something?

3 Likes

Brilliant write up Mattias! Thank you so much for sharing this with the whole Defold community!

1 Like

If there’re no any constraints or pitfalls, why is webp still not a default compression type?

1 Like

It’s a good question, and with our increased support for WebP, it might be a possibility. Perhaps @andreas.tadic have some more thoughts about this?

Before release 1.2.107 WebP was decoded and if applicable (PVRTC and ETC1) post-processed on the main thread. This is no longer the case, so there is no pitfall using WebP at all since the decompression and possible post-processing is done asynchronously now.
The only limitation, if it can be called that is that lossy compression isn’t supported for hardware compressed formats (PVRTC and ETC1). Lossless is however.

I would suggest using WebP as much as possible, especially lossy compression when possible as it has very good compression ratio. You have to play around with the quality setting to get what results are best for you. There has been a problem with alpha-banding is some specific cases. This is solved in release 1.2.108 (next release at the time of writing).

Note that WebP is also supporting compressed texture formats. Here’s an example of total texture size (MB) in a bundle for a project using different compression settings:

RGBA + ZLib 86
RGBA + WebP (lossless) 32
RGBA + WebP (lossy best) 23
PVRTC + ZLib 21
PVRTC + WebP 15
RGBA + WebP (lossy hi) 13

Also, use compressed formats whenever possible. PVRTC is in run-time 1:8, ETC 1:6 ratio compared to a 32-bit RGBA texture. This greatly reduces memory footprint and also helps performance.

Release 1.2.108 will also include new texture 16-bit texture formats, RGB, RGBA and Luminosity with alpha. Those are also supported by WebP.

10 Likes

WebP takes a fair bit longer to compress compared to the default (ZLib) compression so it’s nothing we light-heartedly changed to be the new default. However, we are going to look into how we will handle this in the future.

7 Likes

Loading speed test WebP vs Default compression


vs

Collections are loading using “async_load”
10 fully filled atlases 2048x2048.


Assets for test project from https://kenney.nl

Project (you can check by youself):
WebpSpeedTest.zip (1.3 MB)

My results
Xiaomi Redmi note 4:

First load (A first (and second, sometimes) load all the time faster than next loads.):
Default : 0.55 s
WebP: 1.62 s

20 loads, average value:
Default : 0.95 s
WebP: 2.73 s

iPad4:
First load (on iPad difference between first and next loads smaller):
Default : 1.3 s
WebP: 3.2 s

20 loads, average value:
Default : 1.3 s
WebP: 3.38 s

Conclusion:
My test shows that webp loading ~2.5 - 3 times slower that textures without compression.
But need to undertand that it depend of your atlases and other variables. It’s only synthetic test.

And about build size…
Build with same 10 atlases:
WebP:
ios: 11.2 Mb
android: 9.7Mb
game.arcd file size (resource file with textures): 7.2 Mb

Default:
ios: 14.1 Mb
android: 12.7 Mb
game.arcd file size (resource file with textures): 10.2 Mb

In my example it’s a choice between the ~2.5 - 3 times faster or more than 30% bigger (In example case: ~2 seconds or ~3Mb ). Choose your side =)

UPD: All test result was updated. I forgot to turn off mipmaps in simple textures but in webp textures it was turned off.

New data is more realistic. Sorry for that.

17 Likes

I noticed you’re using lossless compression for webp. This will give you a better result than default compression, but it varies greatly depending on what you’re compressing. In the case of what you’re compressing here (the atlas) it won’t do magic, but again it varies.
What you want to do is testing from normal to best settings using lossy webp compression. The tests we did internally for games at King showed a massive decrease in package size (sometimes about 30% or less of original texture memory size) without any noticeable quality loss.
Regarding the loading time, that seems weird (we haven’t noticed any significant increase).
It can be related to a bug when loading the same texture (atlas or single) simultaneously when loading a collection async. Are you using the same file or using different atlas files?

3 Likes

Here you can download and check my test yourself:

There are different atlases with the same sprites:

Yes, of course you right.
But it’s really depend of many things. But for the test case the lossless compression is the only one option without subjective opinion of one who see the result. In any other tests it can’t be objective.

1 Like

Indeed. What you can expect is usually around 25-30%, sometimes better. It really depends on the source material. This goes for both gzip and png which it’s usually compared to.
If you pack a game that has around 60MB of textures (which is realistic) it’ll still save you around ~20MB compared to the default compression which is a significant win. What benefits webp greatly is it’s quality for lossless mode (normal+ quality) which compresses much better. It does takes some manual labour to set the correct compressions and quality for different textures (using texture profiles) to get optimal results. No question about that.
I am curios about the decompression performance since we haven’t had any noticeable difference on the games we’ve tested. I will have a look at this time given, using your example project (currently a lot of other things prioritised).

Thanks again for your input here, worth it’s weight in gold :slight_smile:

3 Likes

I would be happy if I made some mistake in the tests and in reality loading speed don’t change depending on compression.
Hope you’ll find that’s something wrong in my test when you’ll have time fot this.

2 Likes

Thank you!

1 Like

A lot of people are a bit confused about what the different atlas properties does so here is an explination.


Our atlas without any properties

04

Margin

Adds a margin to your images by moving them appart from each other.
59
The bounding boxes of our images are the same size but there is now a small gap between the images.

Inner Padding

Adds a padding inside of your image bounding box, effectively making the sprite bigger.
25
Notice that the bounding boxes of the sprites are still touching but there is a lot of transparent pixels between the images.

Please not that this changes your sprites sizes. Meaning that if your little dude normally looks like this
33

With some margin added the sprits gets separated and he suddenly looks like this
26

Extrude Borders

Samples the pixel that is at the border of the sprite and extrudes it out.06
You can clearly see that it is extruding the pixels at the border.

13 Likes

Resize images

This post is a response to the post Scale factor in Atlas settings. I often see images that are too big - here are some of my workflows to resize the images.


Macs Automator

Mac has a powerful and under utilized tool called Automator. We can set that up to give us a quick context command to scale images in the finder.

Automator setup

Start the Automator and you will be greeted by a view to chose your type. We want a service, as that will be added to the context menu. Select it and pick Choose.

You will then see a empty view where we will build our workflow. In the Service receives selected [ ] in [ ] pick “image files” and “Finder” respectively.

Search for “scale”

Drag “Scale Image” into the workflow, switch to “By Percentage” and set a value you want, in my case I want to be able to scale down the images by 10% so say “Scale the image to 90%”. Then simply save it by doing “File” -> “Save”.

I named mine “Scale down 10%”, you can now right click on a image and find the resize option under “Services”

Resize all images in an atlas

I have a script that I use myself if I decide I want to resize all images in an atlas by a certain percentage. It have a couple of dependencies - DefTree to parse the Defold files (atlas) and Pillow to resize the image.
pip install deftree and pip install Pillow


Usage: python resize_atlas.py --root "path/to/project" --atlas "path/to/project/atlases/game.atlas" -p 10

Using Image Magick

If I want to resize a folder of images I would use ImageMagicks mogrify command. Simply open a terminal/command line window and cd to the texture folder and then run.
mogrify -resize 90% *.png

Using 3d party applications on Windows

Windows doesn’t have Automator so to add a right click resize option we can use something like Image Resizer.

The standard image viewer in any OS always leaves a bit to be desired, on Windows I have used Irfanview for years and you are able to resize images directly in that. Though, because I already have a lot of other ways to do this (mainly mogrify), I have never used it myself.

12 Likes

Optimising

Loaded Textures

There are a few way to see which textures are currently in memory. You can use the OpenGL Profiler to actually see the atlases and how they look. You can also use Defold’s Web Profiler and the accompanying Resource view to find out the names of the used textures.

It is always harder to find out why your atlas is currently in memory and not if.

Web profiler

A lot of people are familiar with the Web Profilers CPU view, but Defold also have a Resources view that is highly valuable when checking what is loaded. You can switch view in the top left corner.

To see which textures are in memory we need to look for .texturesetc, don’t confuse this with the texturec . The .texturec is bigger and that is because that is the actual generated image. I assume that the .texturesetc is the atlas definition data. Sort on “Type” and check for .texturesetc. In my example above I only have main.texturesetc loaded.

A fast (but not 100% accurate) way to check if the resources is loaded is to open up the Resource view in the web profiler again. Then simply search for the resources. If we find the resource here it means it is loaded and we need to figure out why.

We can also check all texturesetc and reason about them individualy if they should be loaded. Doing that I realise that in this case I think that /main/sneacky.texturesetc shouldn’t be loaded. So now we need to figure out why it is loaded. The easiest way of finding out where it is used it to use Defold’s “Referencing files” tool. So now we go back to Defold and use “Open Asset” and search for sneacky, then we simply right clicking on the tab of the file (or on the file in the Assets view) and selected the menu option “Referencing files”.

Defold-Editor-Referencing-Files

We now get a list of where it is included, so only thing left is to track down from which of all these places it is loaded from. To do this you need to go down the list of every resources to see which of them in turn is used and how. Remember that a gui that uses a resource indirectly (by using a template of a resource that uses it directly) does not show up in the list.

There are a few different ways to load a resource so you need to figure out how it is loaded into the game.

Component File

This includes the referenced collection (or game object, gui or other) in your collection without having the need to dynamically load it. If the scene should be dynamically loaded change it over to a Collection Proxy or Collection Factory.

Collection Proxy

A collection proxy is only loaded if it get a “load” or “async_load” message. Thus if you have a collection proxy that’s loaded even though you think it shouldn’t you need look in your code for when it loads the collection proxy.

Collection Factory

If your resource is loaded in by a collection factory and you don’t want it to always be loaded you can turn on “Load Dynamically” on the properties. If that doesn’t help and it is still loaded it means you do a
collectionfactory.create or collectionfactory.load.

Factory

If your resource is loaded in by a factory and you don’t want it to always be loaded you can turn on
“Load Dynamically” on the properties. If that doesn’t help and it is still loaded it means you do a
factory.create or factory.load.

Example

By checking the web profiler I see that we have an atlas loaded even thought it shouldn’t, I want to find out why and hopefully fix it. I start with finding it in Defold and then checking its Referencing files. A bunch of gui files shows up. I now go back to the web profiler and search for them there, I find out which of the gui scenes are loaded. Now I open up them in Defold and show the referencing files. My gui scene is in a collection proxy so I open that and check the referencing files again. This one points to a bootstrap collection that loads the collections with Factories so we can simply turn on “Load Dynamically” in the factories properties.

Texture Size

One of the mayor attributes that dictate how much memory a texture uses is the actual size. You can easily calculate the size in memory yourself. Given that you are not using mip-maps you calculate it with width * hight * channels, so one of the easiest way to decrease the memory size it to make your atlas smaller. Make sure that you are using all the images you have on your atlas and also make sure they are of an appropriate size.

Example:

A square atlas of 2048 with alpha will take 2048*2048*4 = 16777216bytes or 16.8MB

If the same texture have mip-maps it will be 2048*2048*4 + 1024*1024*4 + 512*512*4 + 256*256*4 = 22282240bytes or 22.3MB

Texture format

Format tells which channels should be included and if you are using an hardware compression, it is essentially how much memory the images will consume. RGB means that the alpha will be discarded, if your images uses alpha and you use this compression where there was alpha before there will now be black. If you images have alpha you want something that have RGBA.

LUMINANCE is a grey scale image so it only uses one channel, if you put in an image with RGB values in an atlas with this format the color of each pixel will be calculated with (something along the line of) 0.3*R+0.59*G+0.11*B this is to represent the colors in a way that takes how the eye works in account.

PVRTC is a hardware compression format for PowerVR GPUs, main usage is for iOS. There are two alternatives for it 2BPPV1 (2 bit mode) or 4BPPV1 (4 bit mode).

ETC1 is a part of the OpenGL ES graphics standard extensions and is mainly used for Android. Note that there are no support for alpha with the ETC1 format.

13 Likes